


Triggers define the conditions that start an automation.
You can use specific QuillCRM events and actions to initiate and run automated workflows.
Core Triggers
QuillCRM Automations provides the following core triggers that you can use to set up your automation workflows:
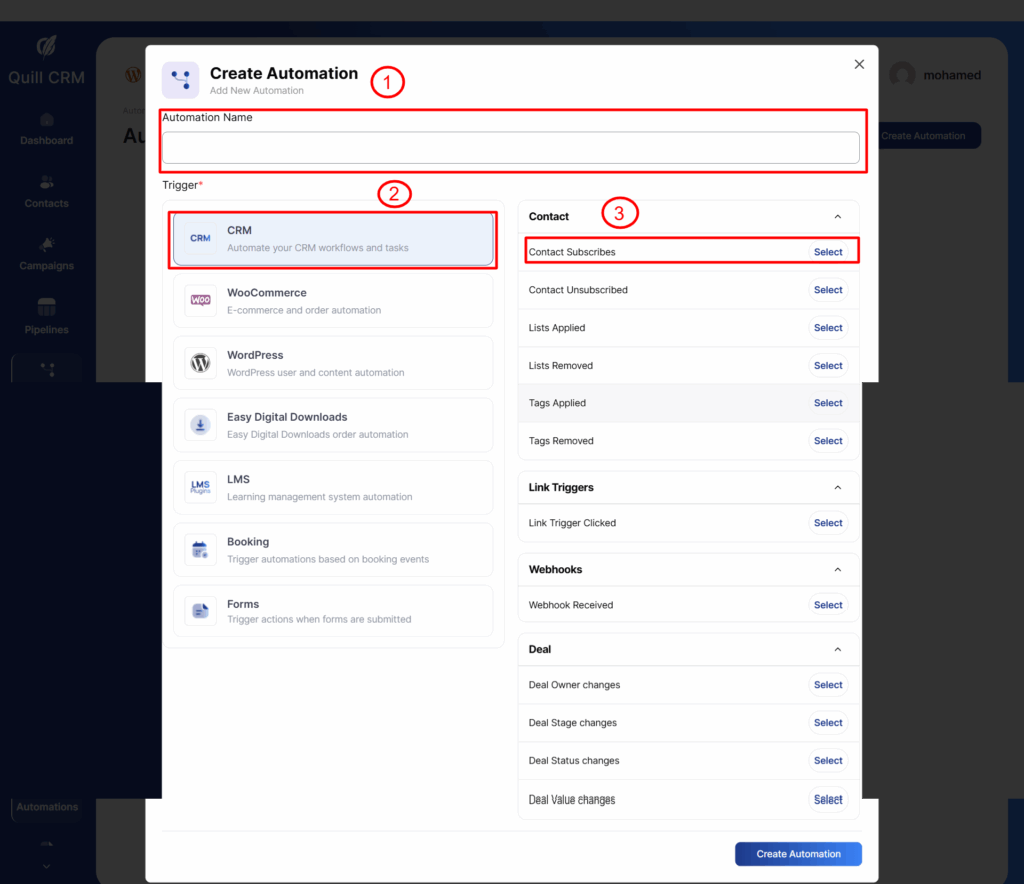
- Contact Subscribes — Automation runs when a contact is added as a subscriber.
- Contact Unsubscribes — Automation is triggered when a contact gets unsubscribed.
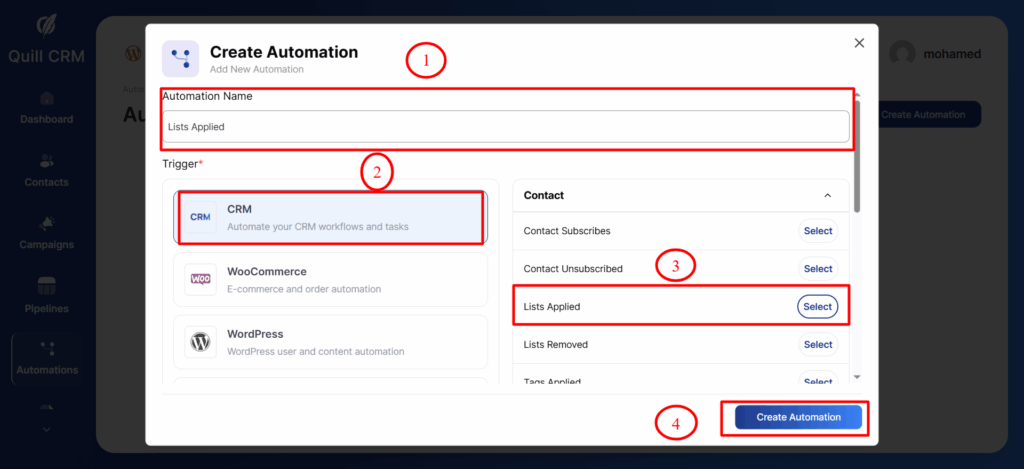
- Lists Applied — Automation gets triggered when a contact is added to a list.
- Lists Removed — Automation starts when a contact is removed from a list.
- Tags Applied — Automation gets triggered when a tag is added to a contact.
- Tags Removed — Automation starts when a tag is removed from a contact.
- Link Trigger Clicked — Automation starts when a particular link gets clicked by the user.
- Webhook Received — Automation gets triggered when QuillCRM receives data from a webhook. Learn more about webhooks here.
Deal Triggers
These deal-related triggers give you enhanced visibility and greater control over deal activities. They allow your automations to respond instantly whenever a key change happens inside a deal.
- Deal Owner Changes — Fires whenever the owner of a deal is updated. Useful for notifying the new owner or updating CRM workflows.
- Deal Stage Changes — Activates when a deal moves from one stage to another. Automate actions based on pipeline progress, such as sending emails or updating fields.
- Deal Status Changes — Runs whenever the status of a deal changes (e.g., Open → Won, Won → Lost). Track deal outcomes, send alerts, or update reports automatically.
- Deal Value Changes — Fires when the monetary value of a deal is modified. Update analytics, notify team members, or recalculate forecasts.
Messaging Triggers
These triggers fire when your CRM receives an inbound message from a contact through any supported communication channel. They require the corresponding channel to be configured in your Mailbox or messaging settings.
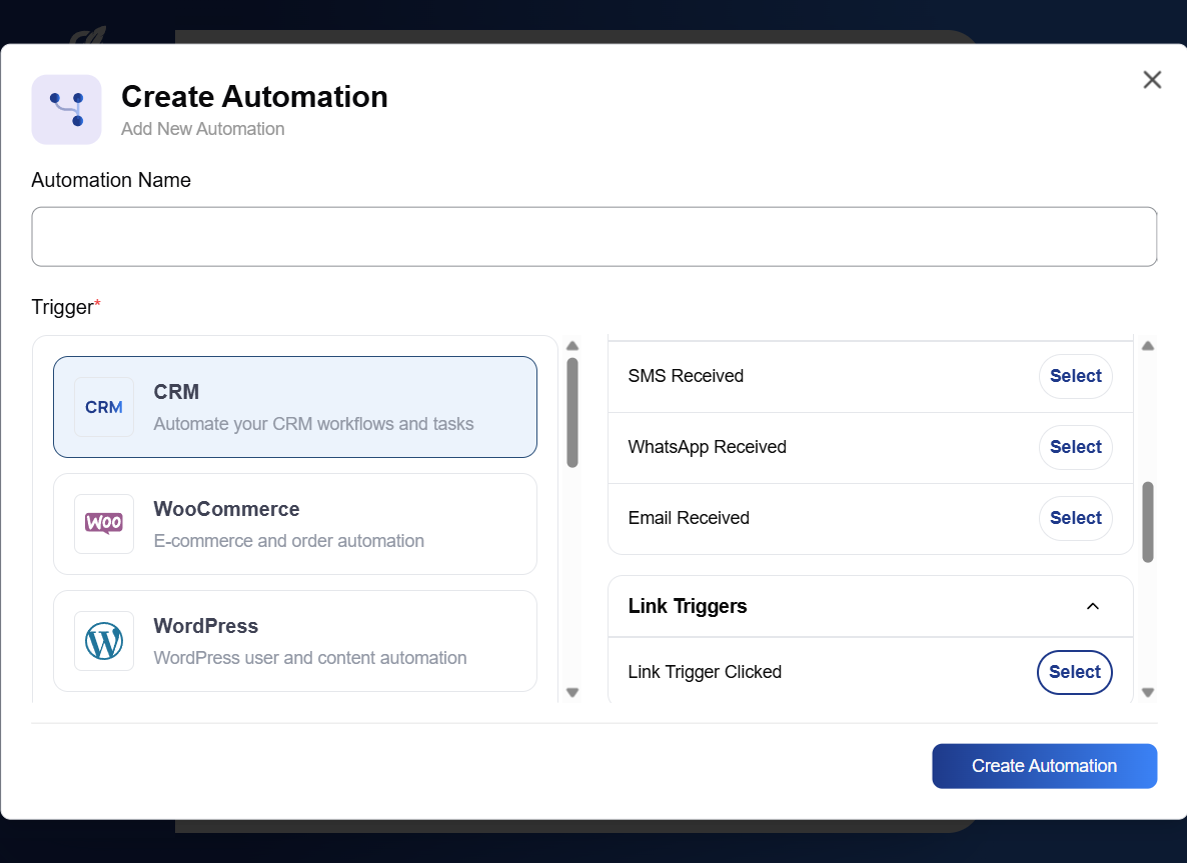
- Email Received — Automation starts when an inbound email is received from a contact via IMAP sync. Requires IMAP to be enabled in your Mailbox settings (shared or personal account). Works with both shared team mailbox and individual personal email accounts.
- SMS Received — Fires when an inbound SMS message is received from a contact. Requires a Twilio connection to be configured.
- WhatsApp Received — Fires when an inbound WhatsApp message is received from a contact. Requires a WhatsApp Business API connection.
Email Received Trigger — Configuration & Usage
The Email Received trigger is particularly powerful because it connects your IMAP inbox directly to your automation workflows. Every time a contact sends you an email that gets synced via IMAP, this trigger fires and can run any sequence of actions.
How It Works
- A contact sends an email to your connected mailbox (shared or personal).
- QuillCRM’s IMAP poller detects the new email and syncs it.
- If the sender matches an existing contact (or Auto-Create Contacts is enabled), the email is imported.
- The Email Received trigger fires, adding the contact to any automations that use this trigger.
- The automation’s steps (actions, conditions, delays) run in sequence for that contact.
Note: Each email only triggers the automation once. Duplicate emails (same Message-ID) are automatically filtered and will not re-trigger.
Trigger Configuration Fields
When you select the Email Received trigger, you can optionally configure filters to narrow which emails start the automation:
- Subject Contains — Enter a keyword or phrase. The automation will only trigger if the email subject contains this text (case-insensitive). Leave empty to trigger on all incoming emails. Example: enter “quote” to only trigger when a contact sends an email with “quote” in the subject line.
- Message Contains — Enter a keyword or phrase. The automation will only trigger if the email body contains this text (case-insensitive). Example: enter “interested” to only trigger when a contact mentions “interested” in their email body.
Both filters are optional. If left empty, the automation triggers on every incoming email from any contact.
Available Merge Tags
When using the Email Received trigger, the following merge tags become available in your automation actions (e.g., Send Email body, Slack notifications, HTTP requests):
{{messaging:email_subject}}— The subject line of the received email.{{messaging:message_body}}— The full body content of the received email.
These merge tags are in the Messaging group and only appear when the automation uses the Email Received trigger (or SMS/WhatsApp Received triggers).
Standard contact merge tags (name, email, phone, etc.) are also available alongside these messaging-specific tags.
Example Use Cases
1. Auto-tag contacts who reply
- Trigger: Email Received (no filters).
- Action: Add Tags → “Replied”.
- Result: Every contact who sends you an email gets the “Replied” tag automatically.
2. Notify your sales team on Slack when a prospect replies
- Trigger: Email Received (no filters).
- Action: Send to Slack Channel → “New reply from {{contact_first_name}} {{contact_last_name}}: {{messaging:email_subject}}”.
- Result: Your team sees a Slack notification with the contact name and email subject every time a contact replies.
3. Send an auto-reply when someone emails about pricing
- Trigger: Email Received → Subject Contains: “pricing”.
- Action: Send Email → Subject: “Re: Pricing Information”, Body: a pre-written pricing overview.
- Result: Any contact who emails with “pricing” in the subject automatically receives your pricing details.
4. Move a deal to the next stage when a contact replies
- Trigger: Email Received (no filters).
- Condition: Check if the contact has a deal in the “Outreach” stage.
- Yes branch → Action: Update Deal Stage → “Engaged”.
- Result: When a prospect replies to your outreach email, their deal automatically moves from “Outreach” to “Engaged”.
Booking Triggers
If you use QuillBooking, these triggers let you automate workflows around appointment and booking events.
- Booking Created — Fires when a new booking is created. Use it to send confirmation emails, add tags, or create a deal for the booked contact.
- Booking Cancelled — Fires when a booking is cancelled. Useful for sending follow-up emails or removing tags.
- Booking Rescheduled — Fires when a booking is rescheduled to a new date/time. Send updated details or notify your team.
Integration-based Triggers
You can always integrate with other WordPress plugins and CRMs to bring in other events and set up automations in QuillCRM Automations.
Go to the following integrations from here:
Some of the available integration trigger categories include:
- WooCommerce — Order Created, Order Completed, Order Status Changed, Order Refunded, Abandoned Cart, Cart Recovered, Review Received, and more.
- WooCommerce Subscriptions — Subscription Created, Renewal Payment Complete/Failed, Status Changed, Trial End, and more.
- WooCommerce Memberships — Membership Created, Membership Status Changed.
- WooCommerce Wishlists — Wishlist Item On Sale, Wishlist Reminder, User Adds Product To Wishlist.
- LearnDash — Course Completed, Lesson Completed, Topic Completed, User Enrolled/Left Course, User Added To Group.
- Tutor LMS — Course Enrolled, Course Completed, Lesson Completed.
- LifterLMS — Course Enrolled/Completed, Lesson Completed, Membership Enrolled.
- LearnPress — Course Enrolled, Course Completed, Lesson Completed.
- MemberPress — Membership Enrolled, Membership Level Expiry.
- Easy Digital Downloads (EDD) — New Order Success.
- SureCart — Order Success, Order Refunded.
- Presto Player — Video Completed, Video Watched.
- WordPress — User Register, User Login, User Role Update.
- Forms — Triggers for QuillForms, Ninja Forms, Forminator, MetForm, Gravity Forms, WPForms, Elementor Forms, Fluent Forms, SureForms, WSForm, Bit Form, and more.
Setting Up a Trigger
- Enter a name for your automation.
- Select the source you want to use, such as CRM, WooCommerce, WordPress, or others.
- Choose the trigger you want to initiate the automation.
- Finally, click the Create Automation button.
Configure the trigger — for example, choose the list that will initiate this automation.
The lists you select will be saved automatically once chosen.
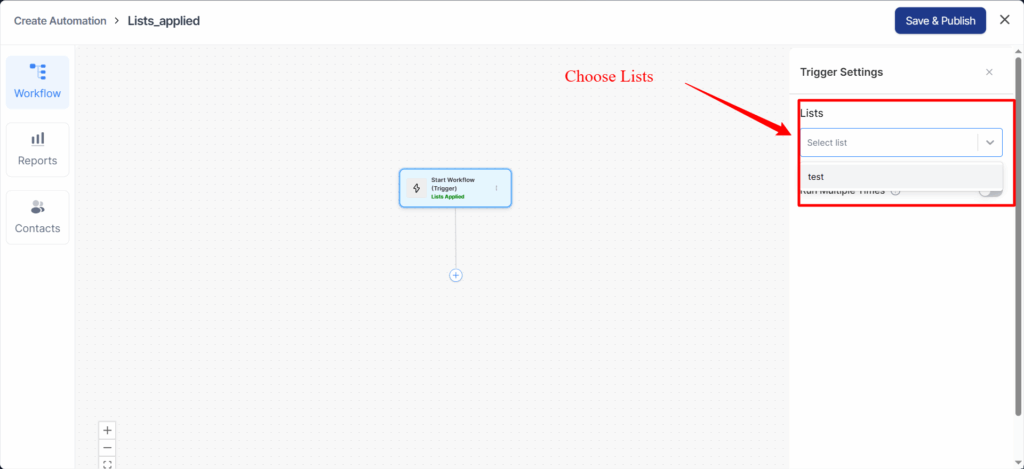
Now, you will define the action that should occur when this trigger is activated.
We’ve explained all available actions in detail in the next section of the documentation.