


The Contact Details page provides a comprehensive view of individual contact information, communication history, and engagement metrics. This page serves as your central hub for managing all interactions with a specific contact.
Accessing Contact Details
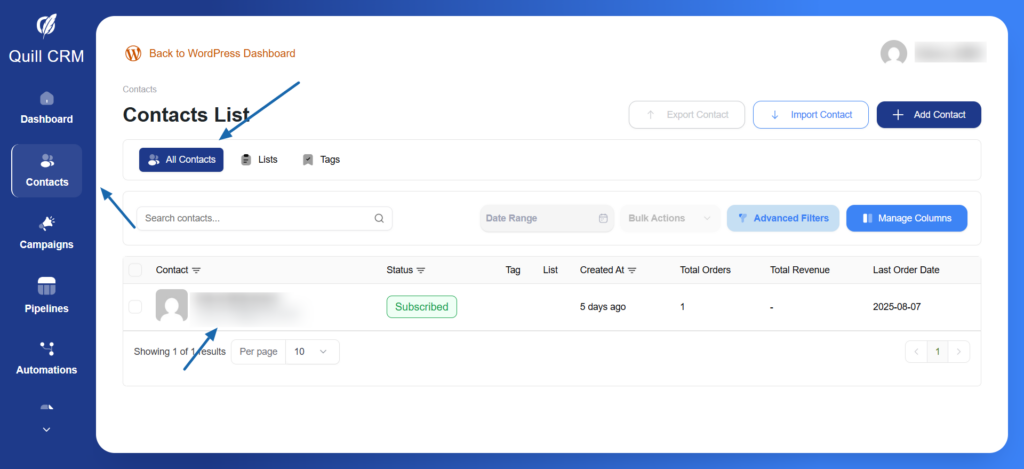
To open the Contact Details page:
- Navigate to Contacts from the left sidebar
- Click on All Contacts tab
- Click on any contact’s name or email in the contacts table
- The Contact Details page will open in a modal window
Contact Profile Overview
Left Panel – Contact Information
The left panel displays the contact’s core information and allows you to manage their profile.
Subscription Status Badges
Two subscription status indicators show the contact’s communication preferences:
- Email Subscription Status
- Subscribed: The person who follows us and wants to receive emails
- Unsubscribed: The person who canceled and no longer wants to hear from us
- Bounced: When the email address is incorrect, so no emails are delivered
- Unverified: We are not yet sure that their email address is valid
- Blocked: We have blocked this email address
- SMS Subscription Status
- Subscribed: The person who follows us and wants to receive sms
- Unsubscribed: The person who canceled and no longer wants to hear from us
- Blocked: We have blocked this phone number
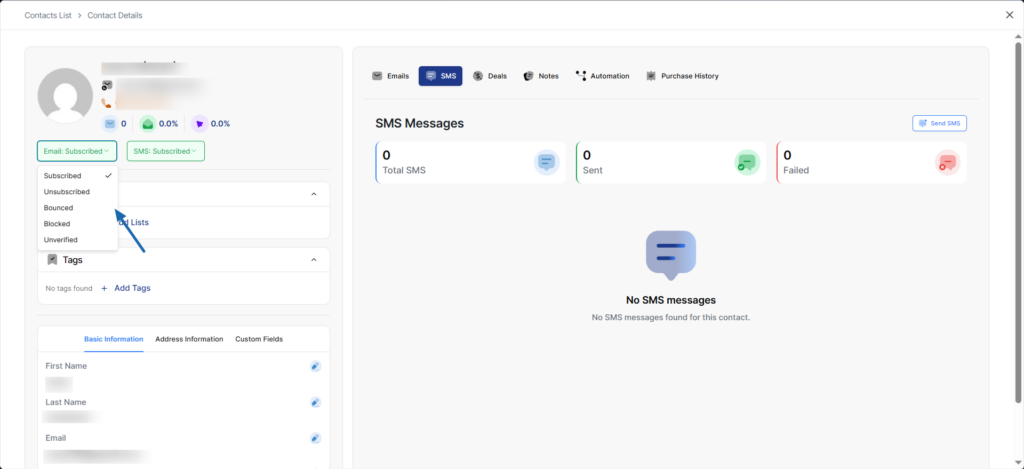
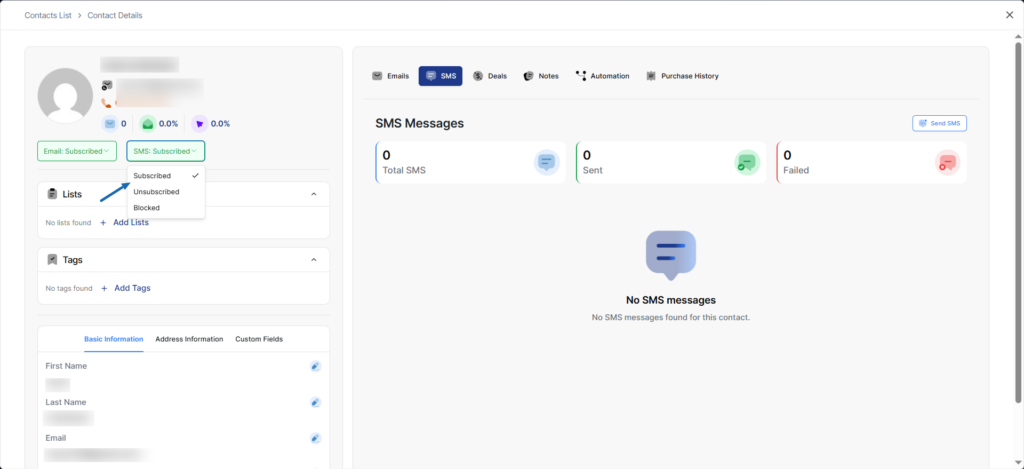
To change subscription status:
- Click on the status badge (Email or SMS)
- Select the desired status from the dropdown menu
- The status will update immediately
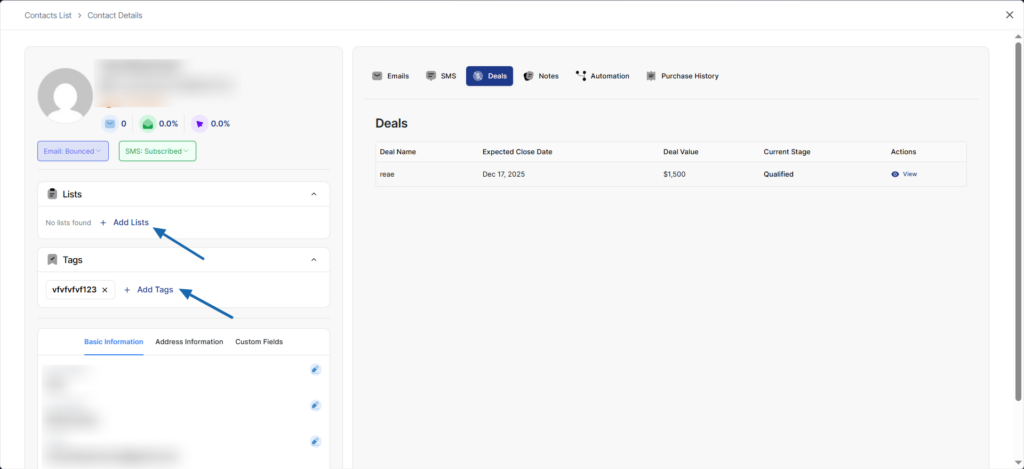
Lists Section
The Lists section shows which lists the contact belongs to.
- “No lists found” message appears when contact isn’t assigned to any list
- List badges appear with an X button for quick removal
- “+ Add Lists” button allows you to assign the contact to one or more lists
Tags Section
The Tags section displays all tags assigned to the contact.
- “No tags found” message appears when contact isn’t assigned to any tag
- Tag badges appear with an X button for quick removal
- “+ Add Tags” button allows you to assign additional tags
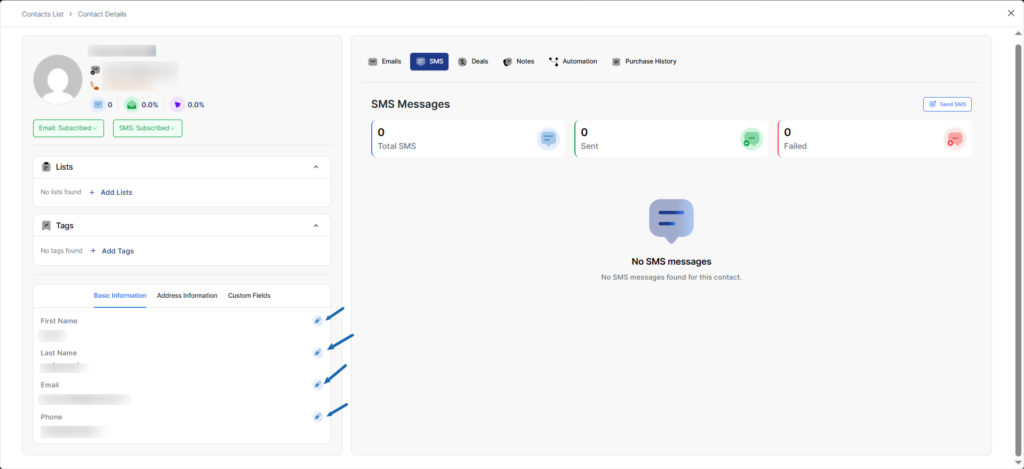
Contact Information Tabs
Below Lists and Tags, three tabs organize detailed contact information:
1. Basic Information Tab (default)
Displays core contact fields:
- First Name – Contact’s first name
- Last Name – Contact’s last name
- Email – Email address
- Phone – Phone number
Each field has an edit icon (pencil) on the right side for quick updates.
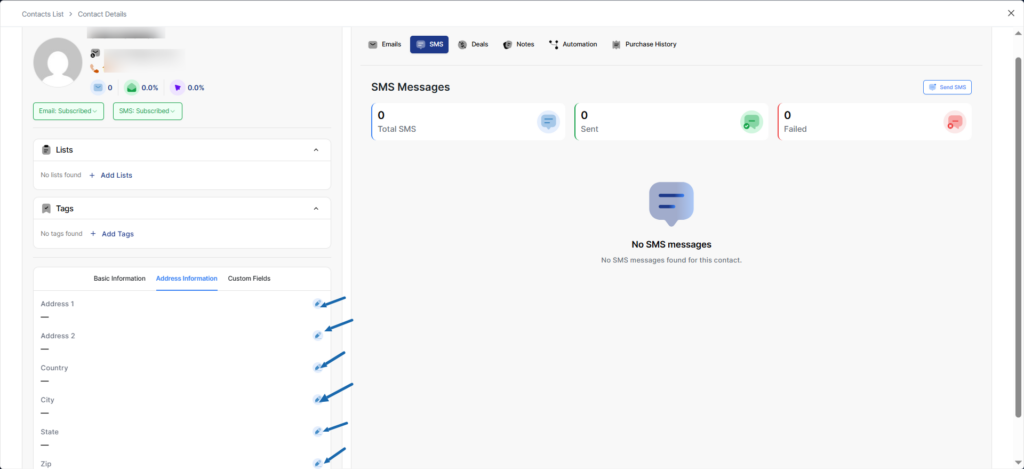
2. Address Information Tab
Contains location and address details:
- Address 1 – Primary address line
- Address 2 – Secondary address line (apartment, suite, etc.)
- Country – Country name
- City – City name
- State – State or province
- Zip – Postal/ZIP code
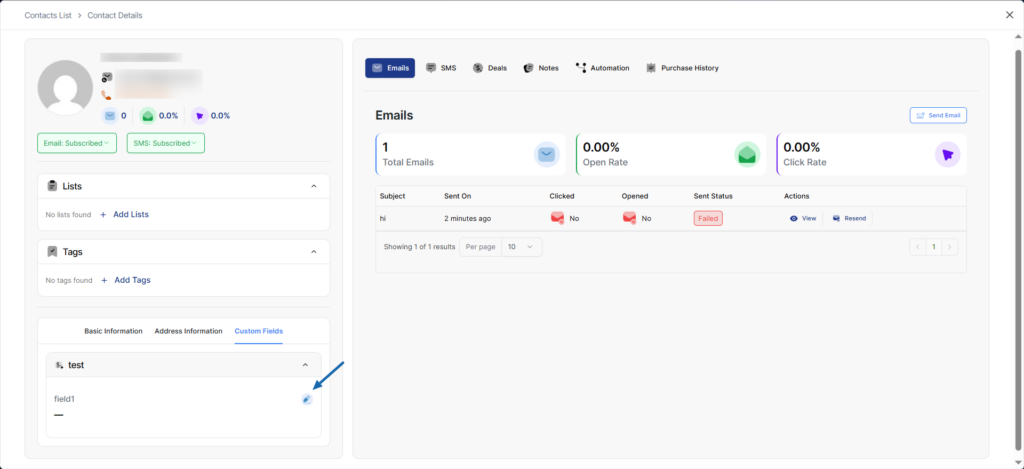
3. Custom Fields Tab
Displays any custom fields you’ve created for contacts. In the example:
- test – Custom field group
- field1 – Custom field value you can change
Custom fields allow you to store business-specific data unique to your needs.
To edit any contact information:
- Click the blue edit icon (pencil) next to the field
- Update the information
- Save the changes
Right Panel – Activity Tabs
The right panel contains multiple tabs showing different types of contact activity and history.
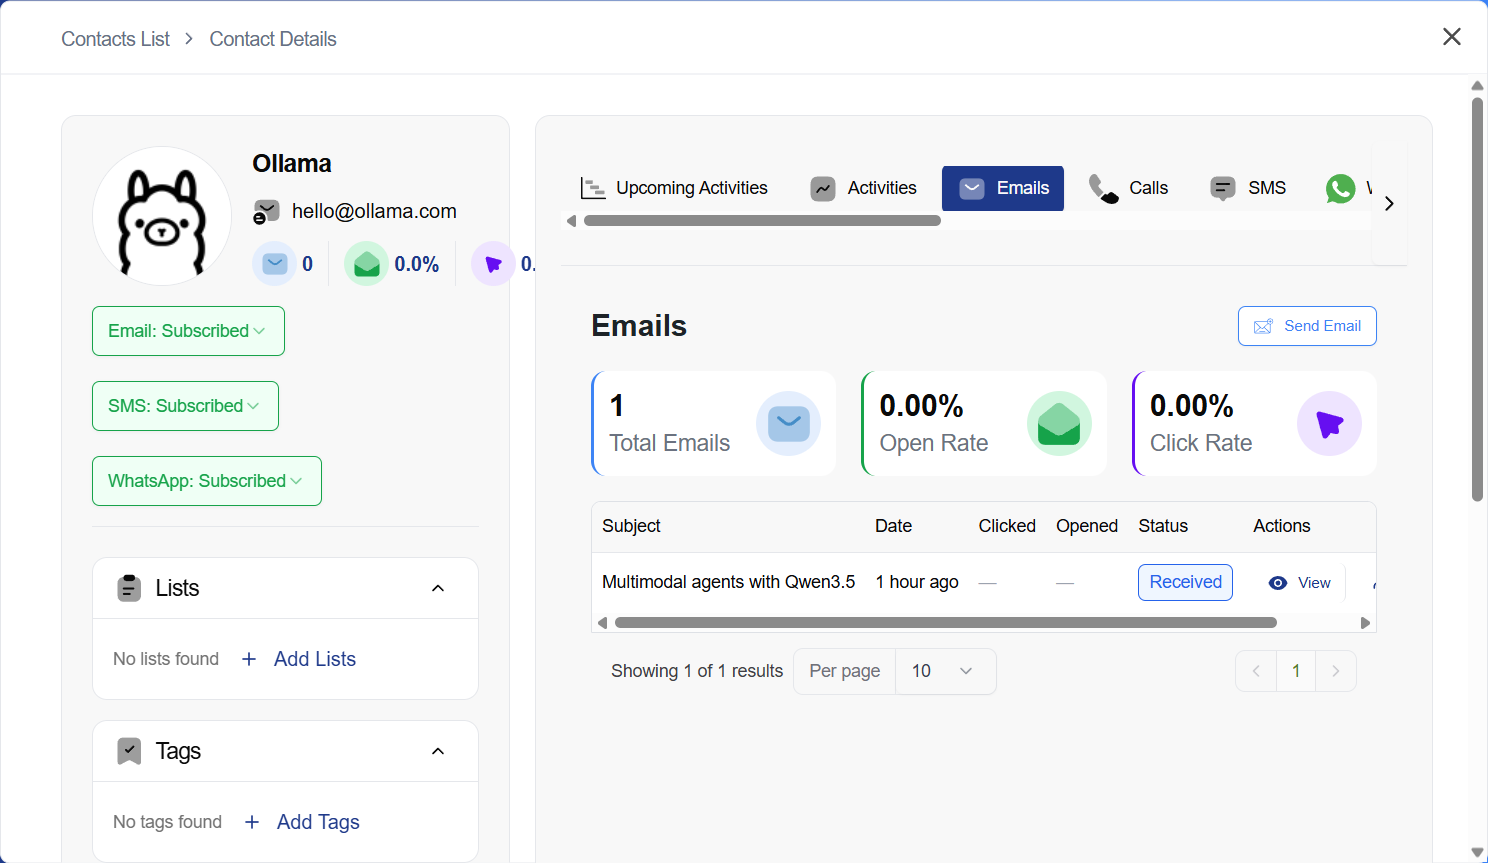
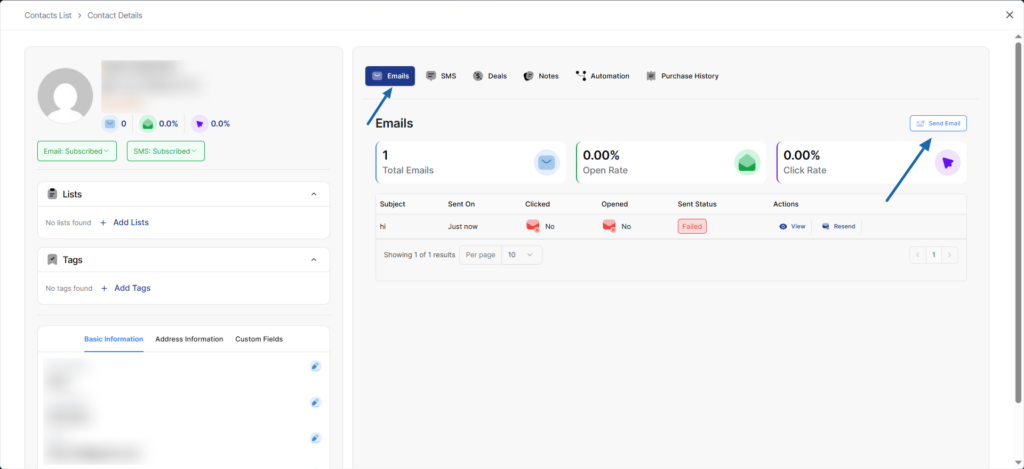
1. Emails Tab
The Emails tab is where you manage all email communication with the contact — sending new emails, viewing sent and received messages, following conversation threads, and replying to inbound emails.
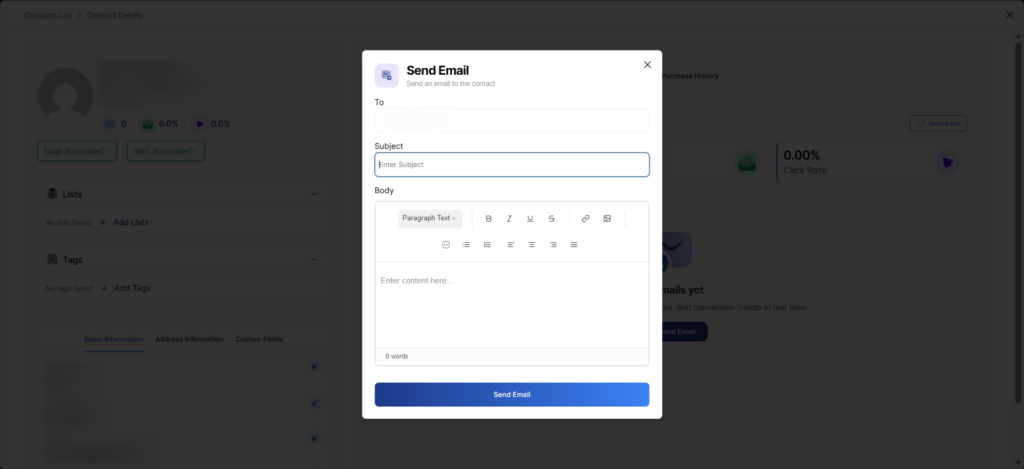
Sending a New Email
Click the Send Email button in the top-right corner of the Emails tab. The Send Email dialog opens with the following fields:
- To — Pre-filled with the contact’s email address (read-only).
- From — Select which account to send from. If you have a personal email configured and enabled, a dropdown appears with Personal (My Email) and Shared options. If only one account is available, it is shown as a read-only field.
- Subject — Enter the email subject line.
- Body — Compose your email using the rich text editor. Formatting options include paragraph styles, bold, italic, underline, strikethrough, links, images, lists, and text alignment.
Click Send Email to deliver the message. The sent email will immediately appear in the Emails tab and in the contact’s Activities timeline.
Note: To configure which email accounts are available (shared and personal), see Mailbox Settings.
Choosing the From Account
When both a personal and shared email are configured:
- Personal (My Email) — Sends from your personal email address. The contact will see your individual name and email.
- Shared — Sends from the team-wide shared email address configured by your admin.
If only the shared account is available (no personal email configured), emails are sent from the shared account automatically and no dropdown is shown.
Email List
The Emails tab displays a table of all sent and received emails with the following columns:
- Subject — The email subject line. Received emails show a directional indicator.
- Date — When the email was sent or received.
- Clicked — Whether the contact clicked any links in the email (shown for outbound emails only; inbound emails display a dash).
- Opened — Whether the contact opened the email (shown for outbound emails only; inbound emails display a dash).
- Status — Delivery status. Shows Sent for successfully delivered outbound emails, Failed for unsuccessful deliveries, or Received for inbound emails.
- Actions — Quick action buttons:
- View — Open the full email details.
- Reply — Reply to a received email (only shown for inbound emails).
- Resend — Resend a sent email (only shown for outbound emails).
Email Details
Click on any email row (or the View button) to open the Email Details dialog. This shows:
- Full email subject and date.
- Sender and recipient information.
- The complete email body rendered in a preview.
- Open and click tracking data.
- A Reply button at the bottom for received emails, or a Resend option for sent emails.
Email Threads
QuillCRM automatically groups related emails into conversation threads. When you send an email and the contact replies, both messages are linked together.
In the email list, threads are displayed as follows:
- The original email appears as the main row with a chevron arrow (›) and a reply count badge (e.g., “1 reply” or “3 replies”).
- Click the chevron to expand the thread. All replies appear indented below the parent with a reply icon.
- Click the chevron again to collapse the thread and hide replies.
Threads are grouped using the In-Reply-To email header for exact matching, and by subject line (ignoring Re:/Fwd: prefixes) as a fallback.
Replying to Emails
There are two ways to reply to a received email:
Option 1: Reply from the Email List
- Find the received email you want to reply to.
- Click the Reply button in the Actions column.
- The Send Email dialog opens with:
- Subject pre-filled as Re: {original subject}.
- To pre-filled with the contact’s email.
- From selector to choose your personal or shared account.
- Body empty for you to type your reply.
- Write your reply and click Send Email.
Option 2: Reply from the Email Details Dialog
- Click on any received email to open the Email Details dialog.
- Review the full email content.
- Click the Reply button at the bottom of the dialog.
- The details dialog closes and the Send Email dialog opens with the same pre-filled fields.
- Write your reply and click Send Email.
Your reply is automatically threaded under the original email. The thread’s reply count badge updates, and the conversation stays organized.
Note: The Reply button only appears on received (inbound) emails. For sent emails, you will see a Resend option instead.
Receiving Replies from Contacts
When a contact replies to an email you sent (using their email client like Gmail, Outlook, etc.):
- QuillCRM’s IMAP sync automatically detects the incoming reply.
- The reply is matched to the original conversation using the In-Reply-To header.
- It appears in the contact’s Emails tab, grouped under the original thread.
- The thread’s reply count badge updates (e.g., “1 reply” → “2 replies”).
- The reply also appears in the contact’s Activities timeline.
This requires IMAP to be enabled in your Mailbox Settings.
Example Conversation Flow
- You send an email from the contact page: “Hi John, following up on our meeting…”
- John replies from Gmail: “Thanks for following up, I have a question about…”
- QuillCRM’s IMAP sync automatically imports John’s reply and threads it under your original email.
- You see the thread in the Emails tab with a “1 reply” badge. Click to expand and read John’s response.
- Click Reply to respond: “Great question, here’s the answer…”
- The thread now shows 2 replies. The entire conversation is visible in one place.
2. SMS Tab
The SMS tab shows text message communications with the contact and you can resend and view old sms.
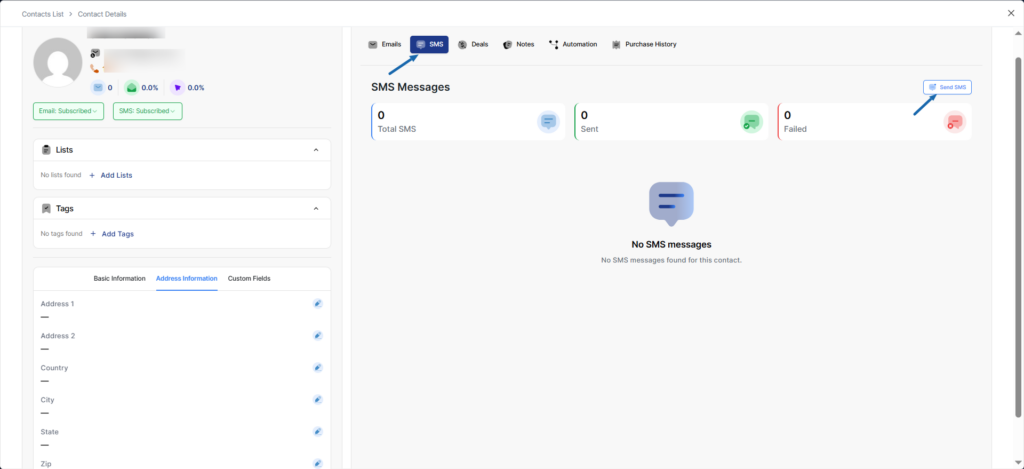
Send SMS Button (top-right corner)
Click to send a new SMS message to the contact.
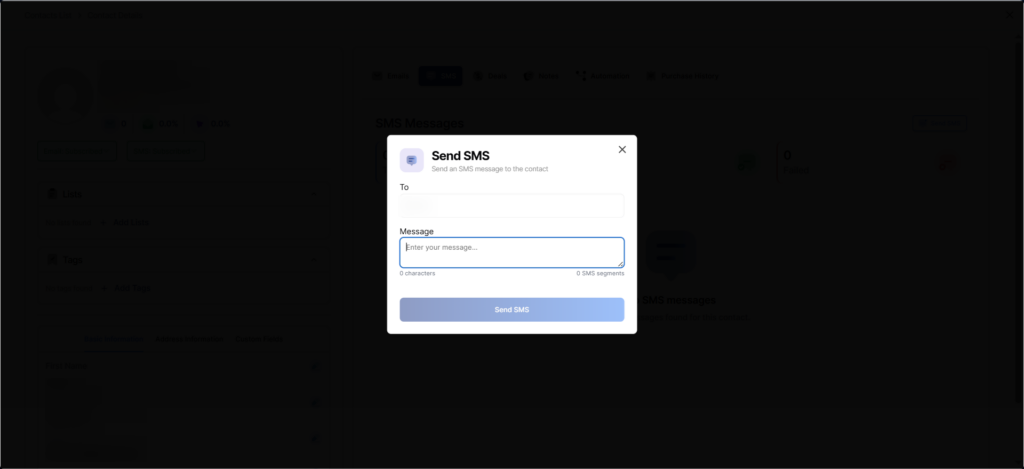
Send SMS form includes:
- To – Auto-filled with contact’s phone number
- Message – Text area for SMS content
- Character counter – Shows characters used and SMS segments
- Send SMS button – Submit the message
3. Deals Tab
The Deals tab displays sales opportunities associated with the contact.
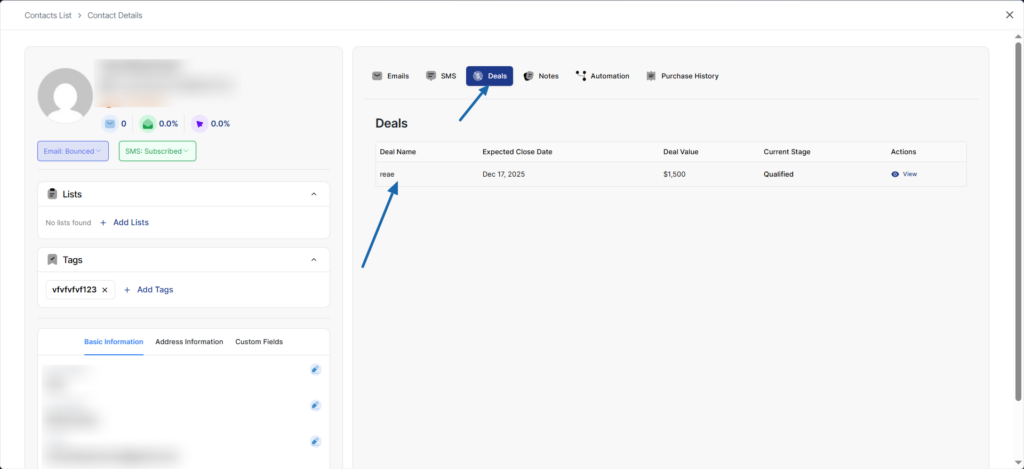
This tab helps you track all sales opportunities for this contact in one place.
4. Notes Tab
The Notes tab allows you to add and manage notes about the contact.
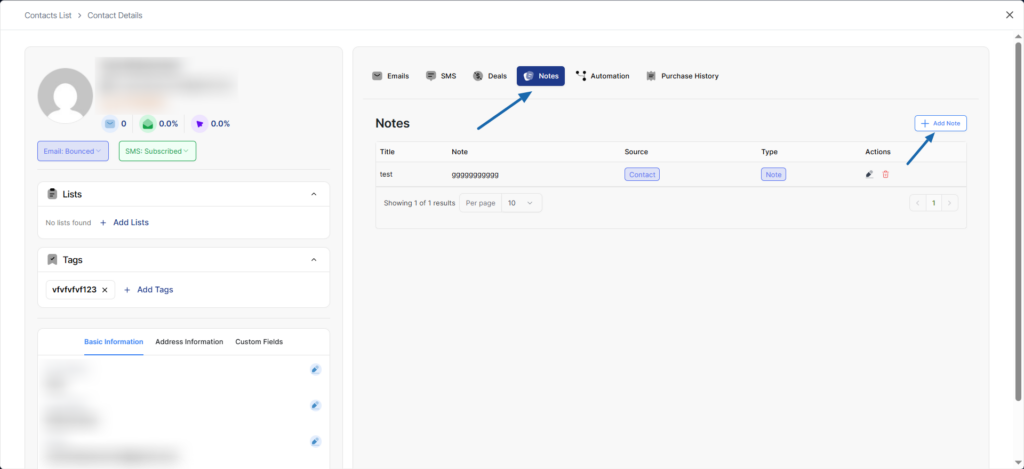
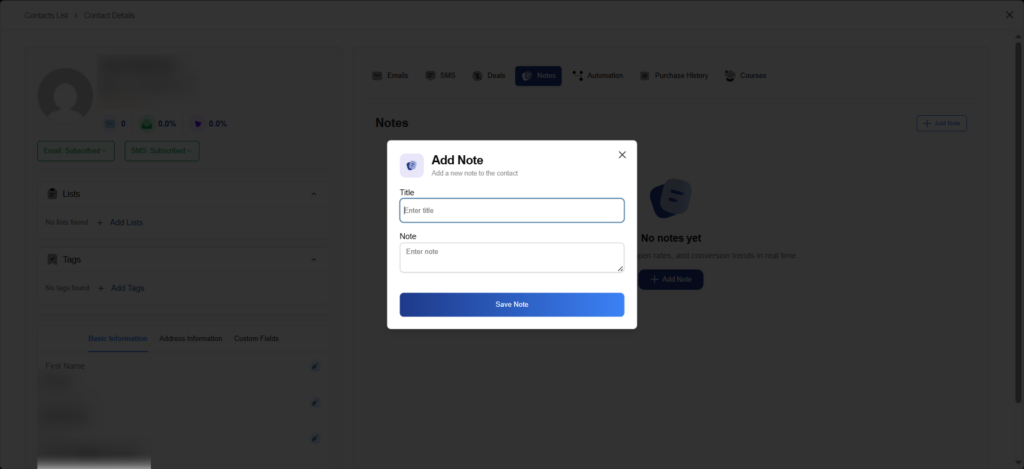
Add Note Button (top-right corner)
Click to create a new note for this contact.
Add Note form includes:
- Title – Enter a note title
- Note – Enter note content (text area)
- Save Note button – Save the note
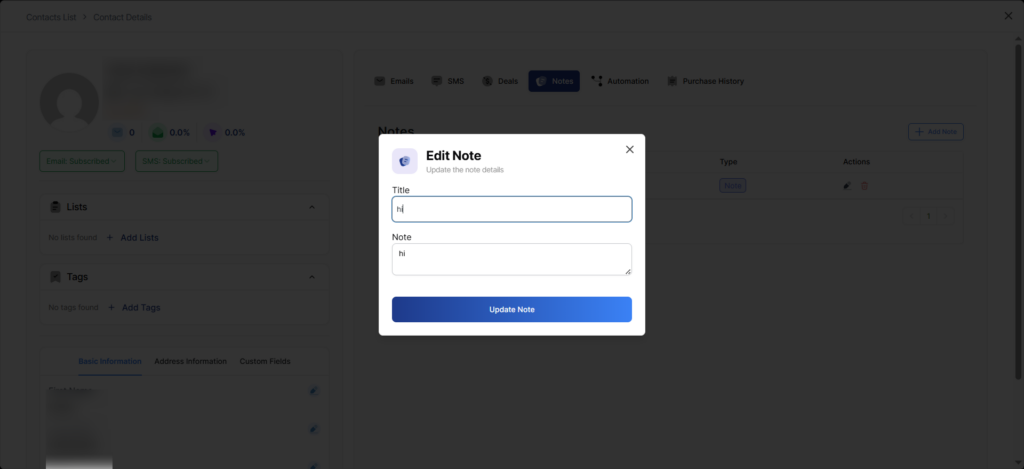
Edit Note
Click the edit icon on any existing note to modify it.
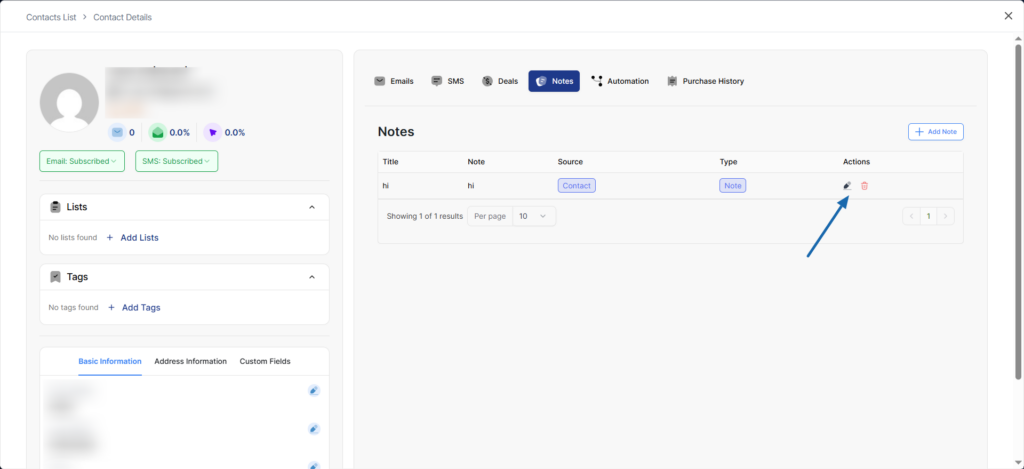
Edit Note form includes:
- Title – Update the note title
- Note – Update the note content
- Update Note button – Save changes
5. Automation Tab
The Automation tab shows all automation workflows that the contact has entered or completed.
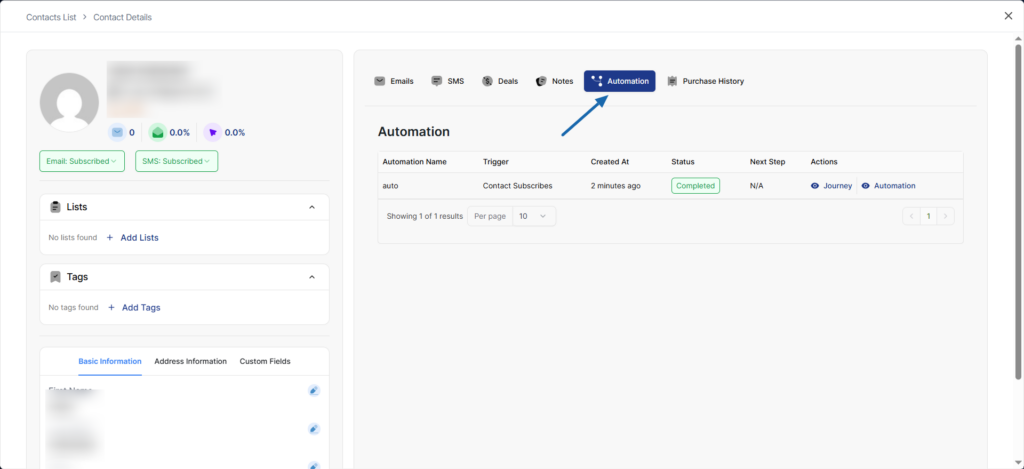
Automation Table Notes:
- Status:
- Completed
- Pending
- Failed
- Actions – Two buttons:
- Journey – View the contact’s path through the automation
- Automation– View the automation workflow details
This provides visibility into how contacts are progressing through your automated workflows.
6. Website Tracking Tab
The Website Tracking tab records every page the contact has visited on your website. This gives you powerful insight into what content, products, or pages each contact is interested in — helping you personalize follow-ups, segment contacts, and trigger automations based on browsing behavior.
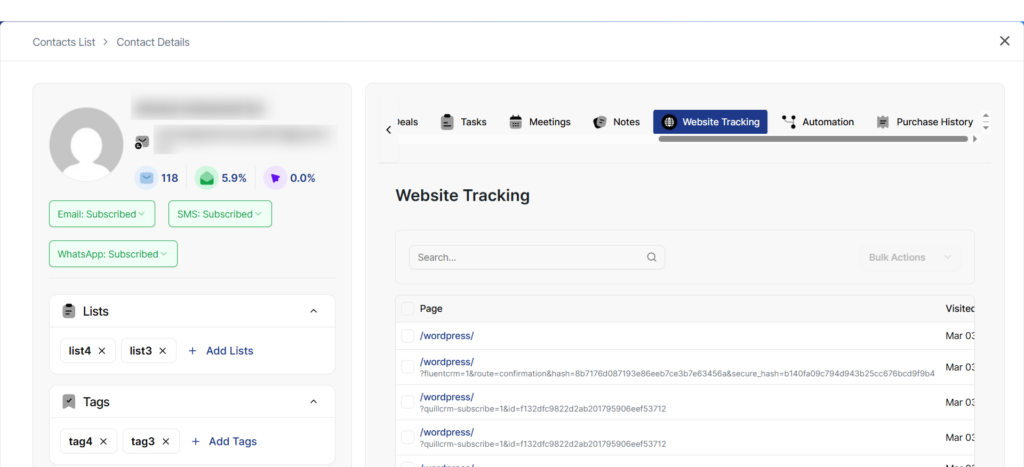
- Page – The URL path the contact visited (e.g.
/wordpress/). If the URL includes query parameters, they are shown below the path. Clicking the page link opens the page in a new tab. - Visited On – The date and time of the visit, formatted as MMM dd, yyyy HH:mm (e.g. Mar 11, 2026 09:57).
- Browser – The browser used for the visit (Chrome, Firefox, Safari, Edge, or Other), detected from the user agent.
Available Actions
- Search – Use the search box to filter page visits by URL path.
- Bulk Delete – Select one or more visits using the checkboxes, choose “Delete” from the Bulk Actions dropdown, and click Apply to remove them.
- Pagination – Navigate between pages of results when a contact has many visits.
How Website Tracking Works
When website tracking is enabled in Settings → Website Tracking, QuillCRM automatically injects a lightweight tracking script on your site’s front end. This script records each page view for identified contacts and stores the page path, query parameters, browser information, and timestamp.
Note: If website tracking is disabled, this tab will display a warning message with a link to enable it in Settings. No data is collected while tracking is turned off.
Use Cases
- Sales follow-ups – See which product or pricing pages a contact browsed before reaching out.
- Content personalization – Identify which blog posts or resources interest a contact.
- Lead scoring – Use page visit activity as a condition in lead scoring rules to award points for high-intent pages.
- Automation triggers – Combine with automations to send targeted emails when a contact visits specific pages.
7. Purchase History Tab
The Purchase History tab shows WooCommerce order data for the contact (requires WooCommerce integration).

This integration helps you understand customer purchase behavior and lifetime value