


The Mailbox settings allow you to configure how QuillCRM handles email communication with your contacts. It has three sub-tabs: Shared Email (team-wide IMAP inbox), Personal Email (per-user email accounts), and Email Provider Setup (OAuth credentials for Gmail and Outlook).
To access Mailbox settings, navigate to Quill CRM → Settings → Mailbox.
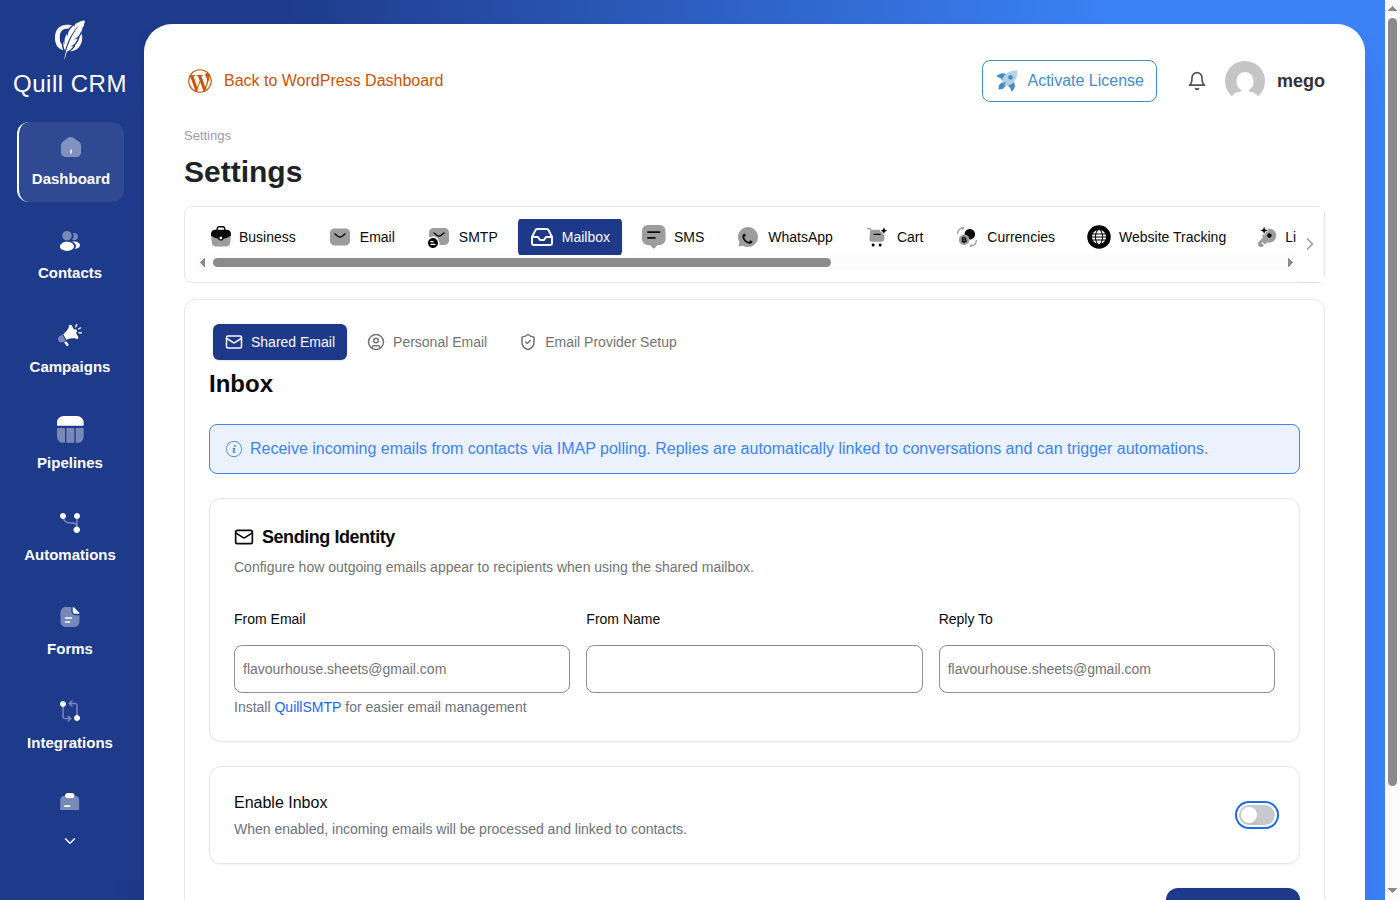
Shared Email
The Shared Email tab configures a team-wide email account. All CRM users share this inbox for sending and receiving emails. Only Admins and CRM Managers can modify these settings.
Sending Identity
Configure the sender information that appears on all outgoing emails sent from the shared account.
From Email
The email address that appears as the sender. If you have QuillSMTP installed, you can select from your configured SMTP connections using a dropdown. Otherwise, enter any email address manually.
From Name
The display name that appears alongside the sender email address (e.g., “Company Support”).
Reply To
The email address that receives replies when a contact responds to your email. Leave empty to use the From Email address.
Enable Inbox
Toggle this on to activate inbound email syncing for the shared mailbox. When enabled, incoming emails will be processed and linked to contacts.
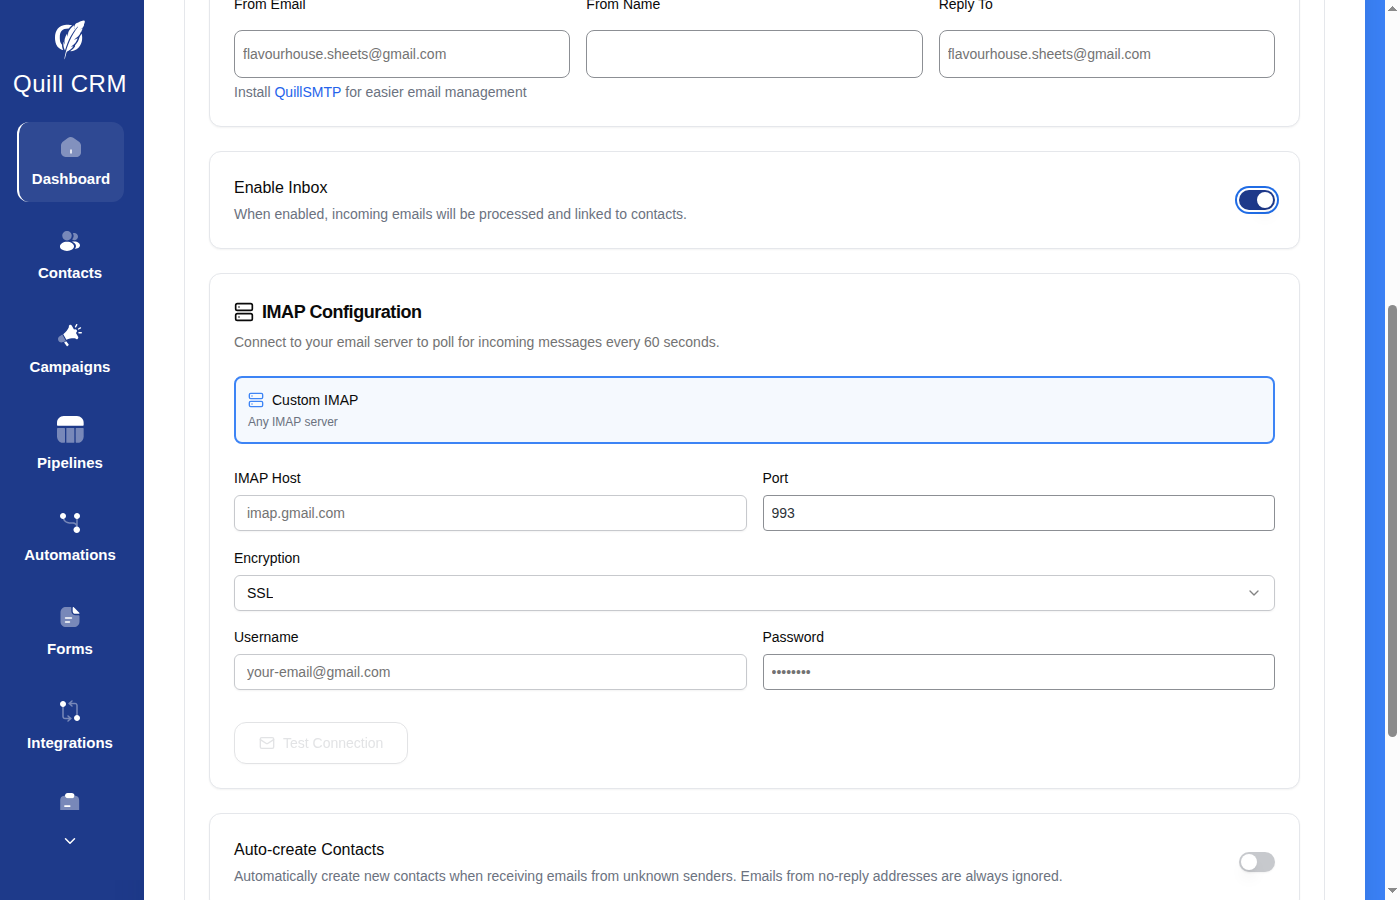
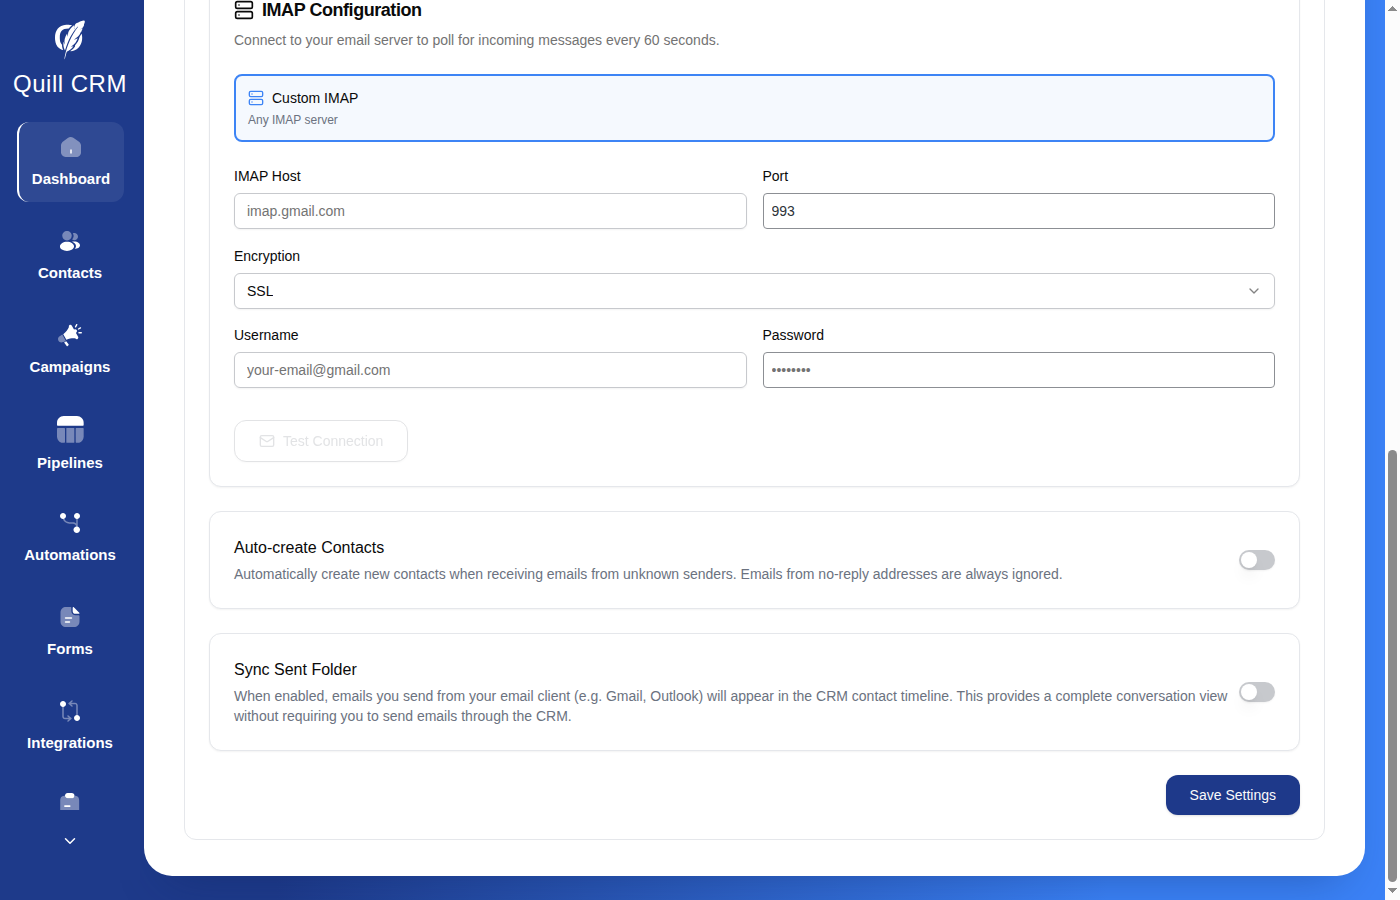
IMAP Configuration
Connect an IMAP inbox so QuillCRM can automatically poll for incoming messages every 60 seconds. This enables two-way email communication directly within your CRM, with replies displayed in the contact timeline.
Provider
The available provider tabs are determined automatically based on your email setup. You may see up to three tabs:
- Gmail — If QuillSMTP has an active Gmail OAuth connection with the
https://mail.google.com/scope, the IMAP connection is reused automatically with no additional setup. If QuillSMTP is not available but Gmail OAuth credentials are configured in the Email Provider Setup tab, you can connect via OAuth by clicking Connect Gmail. - Outlook — Same as Gmail. Reuses QuillSMTP credentials when available, or connects via admin-configured OAuth credentials from the Email Provider Setup tab.
- Custom IMAP — Connect to any email provider using standard IMAP credentials. This tab appears when no OAuth providers are configured, or when your QuillSMTP setup includes non-Gmail/Outlook email accounts (e.g., Zoho Mail, a domain email server).
Gmail / Outlook via QuillSMTP
If QuillSMTP is installed with a Gmail or Outlook OAuth connection, this is the easiest setup option. The IMAP connection is configured automatically.
- Select the Gmail or Outlook tab in the provider selector.
- A green confirmation banner shows the connected email address and confirms that OAuth credentials are being reused from QuillSMTP.
- Click Test Connection to verify IMAP access.
- Click Save.
Note: The QuillSMTP connection must have the mail scope enabled (e.g., https://mail.google.com/ for Gmail) to allow IMAP access.
Direct OAuth (Gmail / Outlook)
If you do not use QuillSMTP but have configured OAuth credentials in the Email Provider Setup tab, you can connect via OAuth directly.
- Select the Gmail or Outlook tab in the provider selector.
- Click Connect Gmail or Connect Outlook. An OAuth popup will open for you to sign in and grant permissions.
- Once authorized, a green “Connected” badge shows your email address.
- Click Test Connection to confirm IMAP access.
- Click Save.
Note: OAuth credentials must first be configured by an Admin or CRM Manager in the Email Provider Setup tab. If credentials are not set up, a warning message will prompt you to configure them.
Custom IMAP
Connect to any email provider using standard IMAP settings.
- Select Custom IMAP as the provider.
- Enter the following details:
- IMAP Host — The server address (e.g.,
imap.gmail.com,imap.mail.yahoo.com). - Port — Typically
993for SSL or143for STARTTLS. - Encryption — Choose SSL, TLS, or None.
- Username — Usually your full email address.
- Password — Your email password or app-specific password.
- IMAP Host — The server address (e.g.,
- Click Test Connection to verify.
- Click Save.
Tip: If QuillSMTP detects email providers from your SMTP configuration (e.g., Zoho Mail), an auto-fill suggestion will appear to pre-populate the IMAP host, port, and encryption settings. When using transactional email providers (SendGrid, Mailgun, Postmark, etc.), configure IMAP for the inbox where replies actually land — typically your domain email server (wherever your MX records point).
Auto-create Contacts
When enabled, if an email arrives from an address not yet in your CRM, a new contact will be created automatically. Emails from common no-reply addresses (noreply@, no-reply@, no_reply@, mailer-daemon@, postmaster@, donotreply@, do-not-reply@) are always filtered automatically.
Excluded Domains
When Auto-create Contacts is enabled, you can specify a list of email domains to ignore. Emails from these domains will not create new contacts. Enter one domain per line. Useful for filtering out automated notifications (e.g., newsletter.example.com).
Sync Sent Folder
When enabled, QuillCRM also monitors the Sent folder of your IMAP mailbox. Emails sent outside of the CRM (e.g., directly from Gmail or Outlook) to known contacts will automatically appear in their CRM timeline. This provides a complete conversation view without requiring you to send emails through the CRM.
Sent Folder Name
When using Custom IMAP with Sync Sent Folder enabled, you can specify the name of the Sent mail folder on your IMAP server. Common names include “Sent”, “Sent Items”, and “Sent Messages”. For Gmail, use [Gmail]/Sent Mail.
Personal Email
The Personal Email tab lets each team member connect their own individual email account. This is useful when sales reps or managers want to send and receive emails from their personal address rather than the shared company inbox.
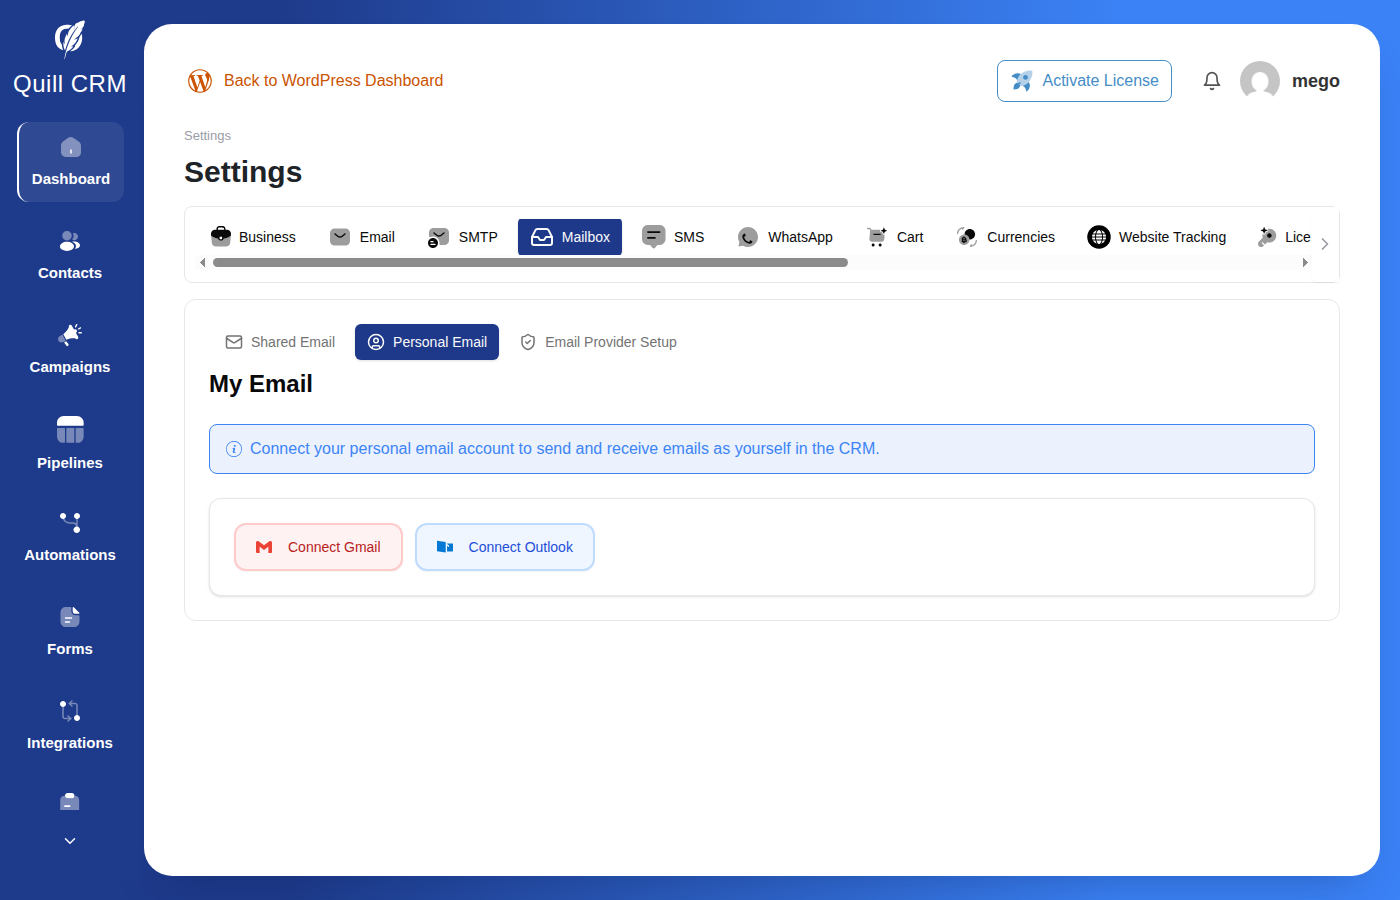
Every user with CRM access can configure their own personal email account, regardless of their role.
Connecting Your Email
Personal email uses a simplified OAuth-based setup — there is no manual IMAP configuration. Available providers depend on what your admin has configured in the Email Provider Setup tab.
- Click Connect Gmail or Connect Outlook.
- An OAuth popup opens. Sign in to your email account and grant permissions.
- Once authorized, a green “Connected as your-email@…” badge confirms the connection. Email sending and IMAP polling are configured automatically.
If no providers are configured by your admin, a warning message will appear with instructions to contact your CRM administrator.
Display Name
The name that appears to email recipients when you send from your personal account. If left blank, your WordPress display name is used as the default.
Options
Sync Sent Folder
When enabled, emails you send from your email client (e.g., directly from Gmail or Outlook) to known CRM contacts will appear in their contact timeline as CRM activities.
Auto-create Contacts
When enabled, incoming emails from unknown senders will automatically create new contact records in the CRM.
Disconnecting
Click the Disconnect button to remove your personal email connection. Your CRM data is preserved — only the email link is removed. You can reconnect at any time.
Troubleshooting
- “No email providers configured by your admin” — Your admin needs to set up Gmail or Outlook credentials in Settings → Mailbox → Email Provider Setup.
- “Your authorization has expired” — Click Reconnect to re-authorize your email account.
- “QuillSMTP plugin is not active” — The QuillSMTP plugin must be active for email sending, OAuth, and IMAP to work. Contact your administrator.
- “Your email sending connection is missing” — Click Reconnect to re-establish the sending connection via QuillSMTP.
Email Provider Setup
The Email Provider Setup tab lets Admins and CRM Managers configure OAuth credentials for Gmail and Outlook. These credentials are shared across the entire CRM — once configured here, all team members can use the Connect Gmail or Connect Outlook buttons in both the Shared Email and Personal Email tabs.
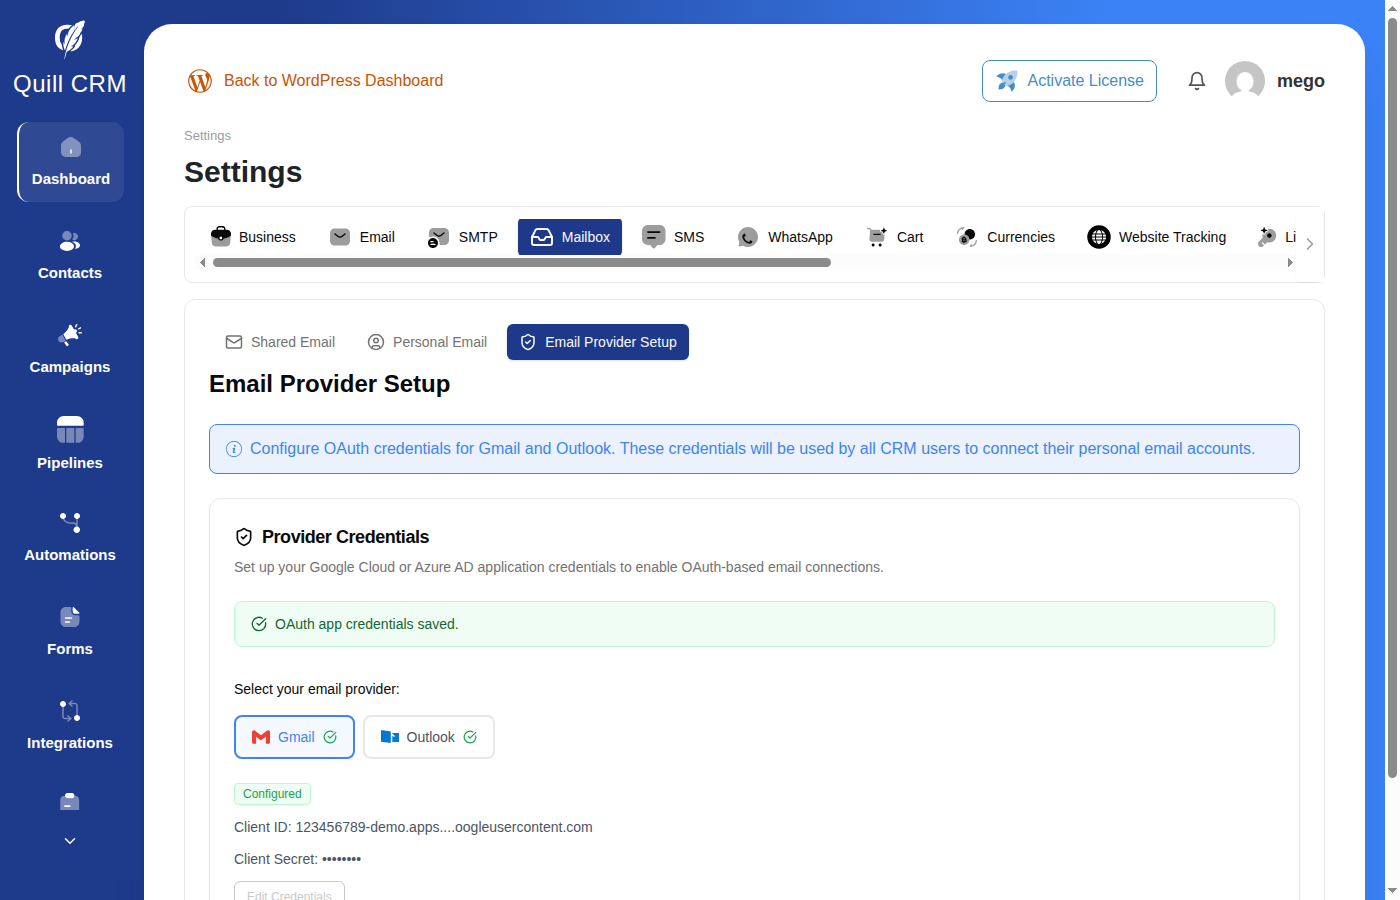
Note: This tab requires QuillSMTP to be installed and active. If QuillSMTP is not detected, a notice will prompt you to install it.
When Do You Need This?
You only need to configure Email Provider Setup if you want to use Direct OAuth connections (i.e., your own Google Cloud or Azure AD app). If you are already using Gmail or Outlook via QuillSMTP, those connections are reused automatically and no additional setup is needed here.
Setting Up Gmail OAuth
- Go to the Google Cloud Console and create or select a project.
- Navigate to APIs & Services → Credentials and create an OAuth 2.0 Client ID (Web application type).
- Copy the Redirect URI shown in the Email Provider Setup tab and add it as an Authorized redirect URI in Google Cloud Console.
- Copy the Client ID and Client Secret from Google Cloud Console.
- Select the Gmail tab in the Email Provider Setup page and paste them into the Client ID and Client Secret fields.
- Click Save Gmail Credentials.
Once saved, a green Configured badge appears next to Gmail. All CRM users can now connect their Gmail accounts from the Shared Email or Personal Email tabs.
Setting Up Outlook OAuth
- Go to the Azure Portal → App registrations and register a new application.
- Under Authentication, add the Redirect URI shown in the Email Provider Setup tab as a Web redirect URI.
- Under Certificates & secrets, create a new client secret.
- Copy the Application (client) ID and the Client Secret value.
- Select the Outlook tab in the Email Provider Setup page and paste them into the Client ID and Client Secret fields.
- Click Save Outlook Credentials.
Once saved, a green Configured badge appears next to Outlook. All CRM users can now connect their Outlook accounts.
Editing or Updating Credentials
If you need to rotate your OAuth credentials or switch to a different Google Cloud / Azure project:
- Click Edit Credentials on the configured provider.
- Enter the new Client ID and Client Secret.
- Click Save.
Note: Updating credentials will require all users who connected via Direct OAuth to reconnect their accounts.
Inbound Email Sync
When IMAP is enabled, QuillCRM automatically polls the connected inbox every 60 seconds to check for new emails.
What gets synced:
- Incoming emails from addresses that match existing contacts in your CRM.
- If Auto-Create Contacts is enabled, emails from new addresses will also create a contact record.
- If Sync Sent Emails is enabled, emails you sent outside of the CRM (e.g., from Gmail directly) to known contacts are also captured.
What gets filtered:
- Emails from domains listed in Excluded Domains.
- Emails from no-reply addresses (noreply@, no-reply@, no_reply@, mailer-daemon@, postmaster@, donotreply@, do-not-reply@).
- Duplicate emails (based on Message-ID) are never imported twice.
- Emails originally sent through the CRM are not re-imported from the Sent folder.
What Doesn’t Get Synced
Historical emails are not imported. The IMAP sync is forward-looking — it captures new email correspondence going forward, not your existing email history. If you connect a mailbox today, expect to see emails that arrive (or are sent) from this point onward, not the archive of past conversations you had with a contact in another mail client.
Specifically:
- On the very first poll after connecting a mailbox, only emails from the past 24 hours are pulled in.
- On subsequent polls, the sync only looks back to the last successful poll (with a small 5-minute overlap), and never further than 7 days in any case — even if polling has been paused or interrupted.
- Each poll cycle imports at most ~20 new inbox messages and ~100 sent-folder messages per connected user, so very high-volume mailboxes catch up gradually rather than all at once.
If you need to bring older threads with a contact into the CRM, the IMAP sync will not retroactively do that for you. Keep the mailbox connected so new replies in those threads are captured going forward, or contact support if you need a one-time historical import.
Sent-folder sync requires existing contacts. Unlike inbox sync, the Sync Sent Folder feature only attaches messages to recipients who already exist as contacts in your CRM. The Auto-create Contacts option only applies to incoming mail — it does not auto-create contacts from addresses you have emailed. If you send an email from your mail client to a brand-new address that is not yet a CRM contact, that message will not appear anywhere in the CRM.
Sending, Viewing & Replying to Emails
Once your mailbox is configured, you can send, view, and reply to emails directly from any contact’s detail page. For full details on how to:
- Compose and send emails
- Choose between personal and shared accounts
- View the email list and email details
- Follow email threads with expand/collapse
- Reply to received emails
- Track an example conversation flow
See the Contact Details → Emails Tab documentation.
Automation Integration
When IMAP is enabled, every incoming email that gets synced can automatically trigger automations using the Email Received trigger. This connects your inbox directly to your automation workflows.
How It Works
- A contact sends an email to your connected mailbox (shared or personal).
- QuillCRM’s IMAP poller detects and imports the new email.
- The Email Received automation trigger fires for the contact.
- Any active automations using this trigger will run their workflow steps for that contact.
Each email only triggers automations once — duplicate emails (same Message-ID) are automatically filtered.
What You Can Automate
With the Email Received trigger, you can build workflows that respond to incoming emails automatically:
- Auto-tag contacts who reply to your outreach (e.g., add a “Replied” tag).
- Send auto-reply emails acknowledging receipt (e.g., “Thanks for your email, we’ll get back to you shortly”).
- Notify your team on Slack when a prospect replies, including the email subject in the message.
- Move deals forward by updating a deal’s stage when a contact responds.
- Filter by content using the trigger’s Subject Contains or Message Contains fields to only automate specific emails (e.g., emails mentioning “pricing”).
Merge tags {{messaging:email_subject}} and {{messaging:message_body}} let you reference the incoming email’s subject and body in your automation actions.
For full details on setting up the Email Received trigger, configuring filters, and example workflows, see Automation Triggers.
Role Permissions
Access to Mailbox settings varies by user role:
| Capability | Admin | CRM Manager | Sales Manager | Sales Rep |
|---|---|---|---|---|
| View/Edit Shared Email Settings | ✓ | ✓ | ✗ | ✗ |
| Test Shared IMAP Connection | ✓ | ✓ | ✗ | ✗ |
| Configure Email Provider Setup | ✓ | ✓ | ✗ | ✗ |
| View/Edit Personal Email | ✓ | ✓ | ✓ | ✓ |
| Test Personal IMAP Connection | ✓ | ✓ | ✓ | ✓ |
| Send Emails | ✓ | ✓ | ✓ | ✓ |
| View Email Threads | ✓ | ✓ | ✓ | ✓ |
| Reply to Emails | ✓ | ✓ | ✓ | ✓ |
Sales Managers and Sales Reps can only see the Personal Email tab in settings. The Shared Email and Email Provider Setup tabs are only visible to Admins and CRM Managers.
All roles can send emails, view email threads, and reply to emails from any contact they have access to.