


Automated Campaigns in QuillCRM let you send emails automatically based on events (like publishing a new blog post or product) or on a recurring schedule (daily, weekly, or monthly). Unlike standard campaigns that are sent once manually, automated campaigns stay active and fire every time the trigger condition is met.
Automated vs Standard Campaigns
| Feature | Standard Campaign | Automated Campaign |
|---|---|---|
| Sending | Manual, one-time | Automatic, recurring |
| Trigger | None—you click Send | Event-based or schedule-based |
| Status lifecycle | Draft → Scheduled → Sending → Sent | Draft ↔ Active (repeating) |
| Editable while active | No | Yes |
| Execution history | Single send | Multiple runs with batch tracking |
Campaigns List
All automated campaigns appear in the Email Campaigns tab alongside standard campaigns. Automated campaigns are identified by the “Automated Campaign” type badge and display an Active or Draft status badge.
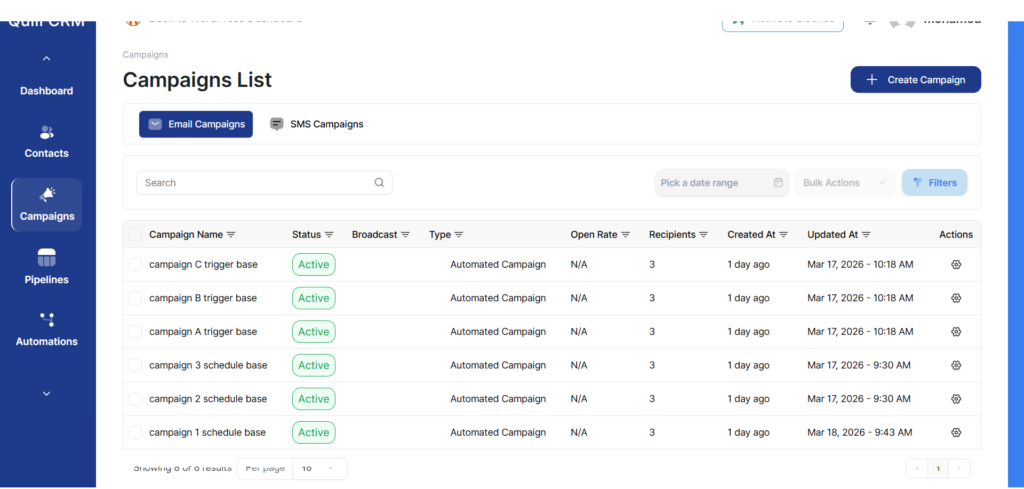
From the campaigns list, you can:
- Activate / Deactivate an automated campaign using the actions menu
- Search campaigns by name
- Filter by date range, status, or type
- Bulk delete selected campaigns
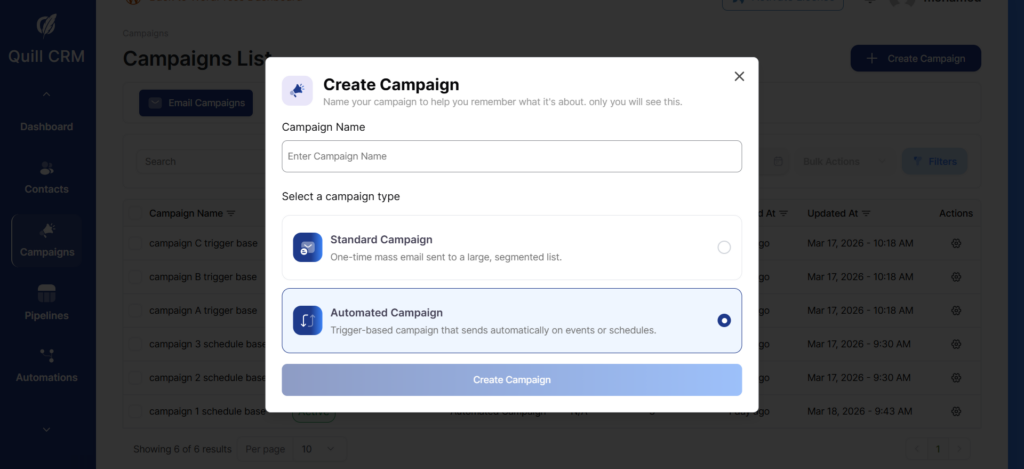
Creating an Automated Campaign
To create a new automated campaign:
- Navigate to Campaigns from the QuillCRM sidebar
- Click + Create Campaign
- Enter a Campaign Name
- Select Automated Campaign as the campaign type
- Click Create Campaign
Campaign Setup Steps
After creating an automated campaign, you are guided through a 5-step setup wizard:
- Trigger – Configure when and how the campaign fires
- Set-up Info—Set the email subject, sender name, sender email, and reply-to address
- Builder – Design your email content using the drag-and-drop email builder
- Recipients—Choose which contacts receive the email (by lists, tags, or segments)
- Review – Review all settings before activating the campaign
Step 1: Configure Trigger
The trigger step is unique to automated campaigns. It defines when the campaign should send. You can choose between two trigger types:
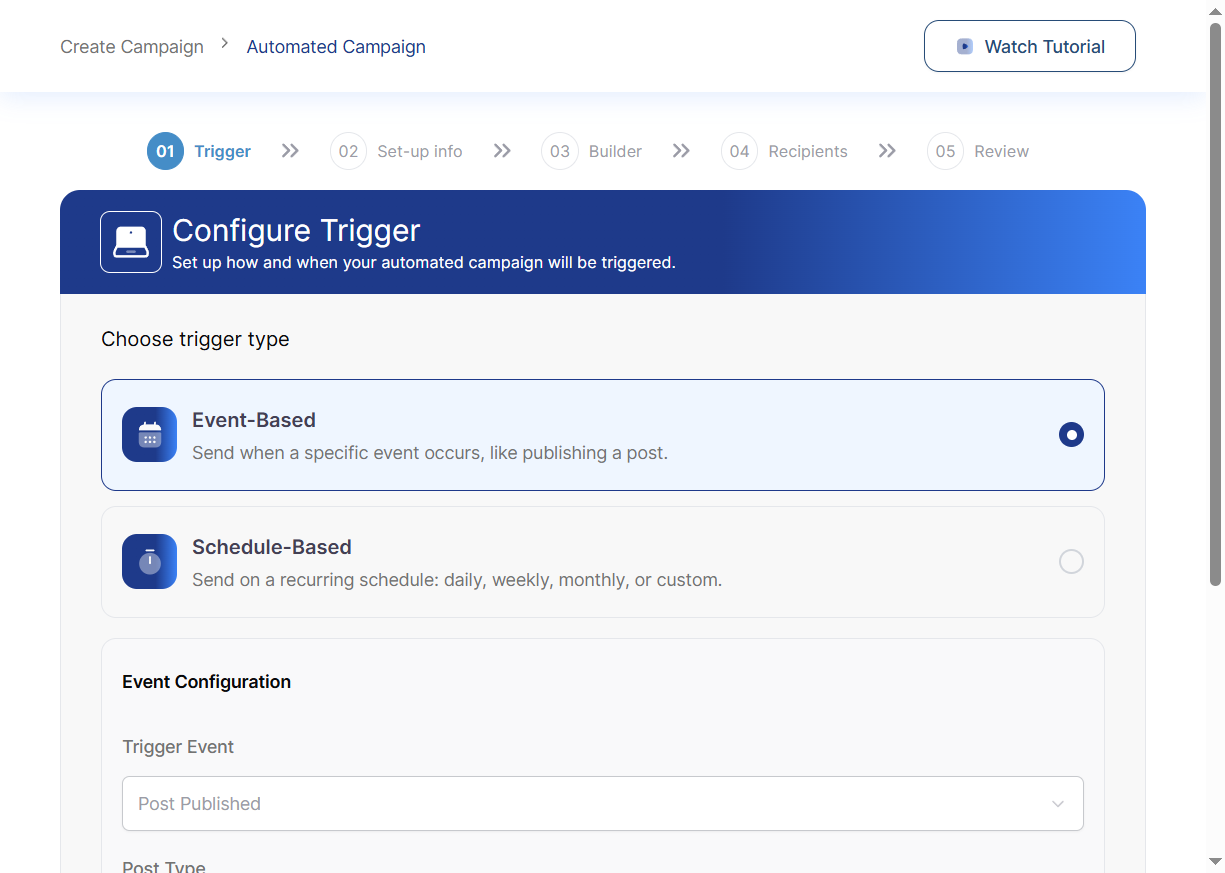
Event-Based Trigger
Sends the campaign automatically when a specific event occurs on your WordPress site.
Available events:
- Post Published – Triggers when a new post, page, or product is published
Event configuration options:
- Trigger Event – Select the event type (e.g., Post Published)
- Post Type – Choose which content type triggers the campaign: Post, Page, or Product (WooCommerce)
- Categories (optional)—Limit the trigger to specific post or product categories
Example: Send a newsletter to all subscribers every time you publish a new blog post in the “News” category.
Schedule-Based Trigger
Sends the campaign on a recurring schedule regardless of any specific event.
Schedule options:
- Frequency – Daily, Weekly, or Monthly
- Time—Select the time of day to send (15-minute intervals)
- Day of Week (weekly) – Choose which day to send each week (e.g., Monday)
- Day of Month (monthly) – Choose which day to send each month (1–31)
Example: Send a weekly product digest every Monday at 9:00 AM.
Steps 2–4: Set-up Info, Builder & Recipients
These steps work the same as standard campaigns:
- Set-up Info – Configure the email subject line, preview text, sender name, sender email address, and reply-to email. For event-based campaigns, you can use merge tags like
{post_title}in the subject to dynamically insert the published post’s title. - Builder – Design your email using the visual drag-and-drop email builder. Add text blocks, images, buttons, dividers, and more. For event-based campaigns, special merge tags for post content, featured image, and post URL are available.
- Recipients – Select the target audience by choosing specific lists, tags, or segments. The campaign will be sent to all contacts matching the selected criteria each time it runs.
Step 5: Review & Activate
The Review step shows a summary of your entire campaign configuration:
- Trigger type and settings
- Email subject and sender info
- Recipient lists/tags/segments
- Number of eligible contacts
Click Activate to make the campaign live. Once activated, it will start listening for the configured trigger and send automatically.
Campaign Overview & Execution Runs
After an automated campaign has been activated and executed, you can view its performance in the Overview tab. Unlike standard campaigns that show a single send, automated campaigns display a list of execution runs – each run represents one trigger firing.
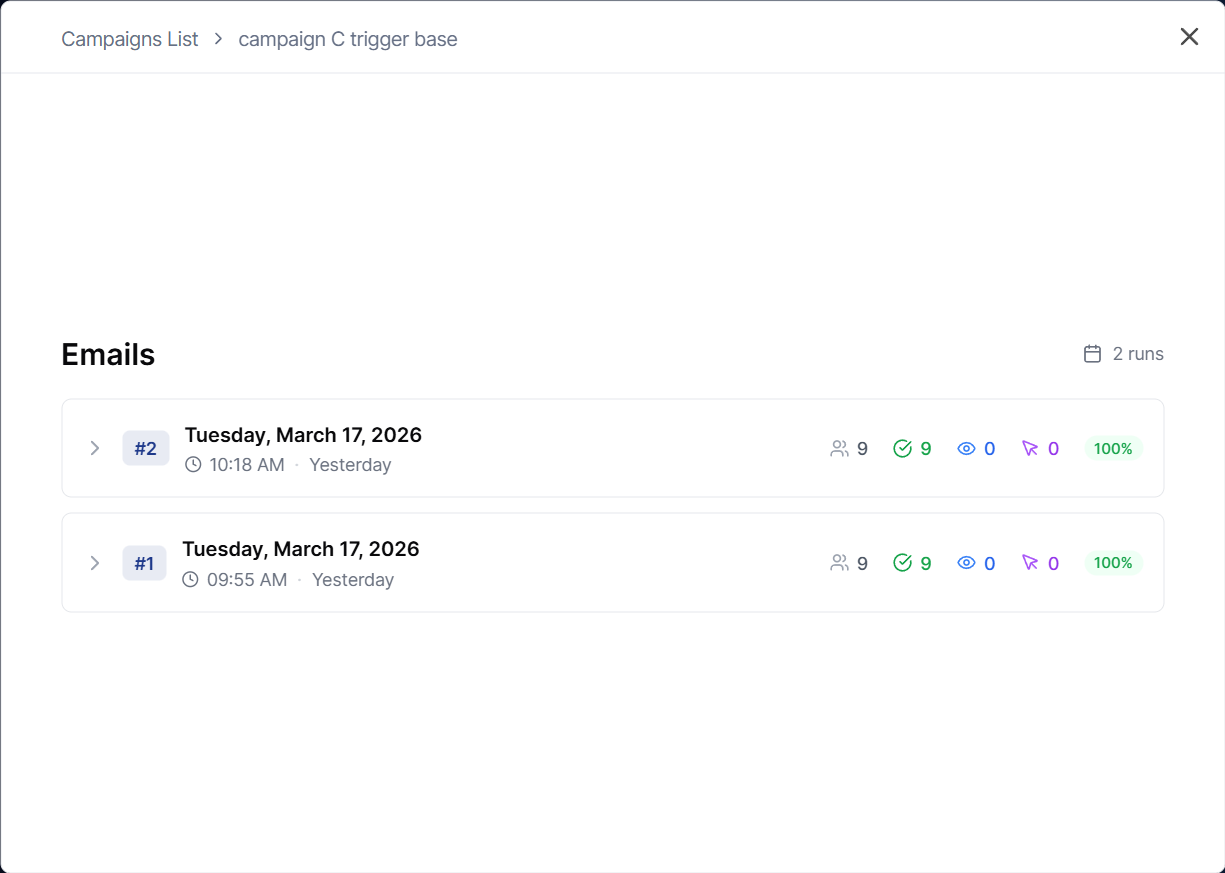
Each run shows:
- Run number (#1, #2, etc.) – Sequential execution counter
- Date & time – When the run was triggered
- Recipients – Number of contacts the email was sent to
- Sent – Successfully delivered emails
- Opened – Number of recipients who opened the email
- Failed – Emails that failed to send
- Success rate – Percentage of successfully sent emails
Click the expand arrow on any run to see the individual email messages and their delivery status.
Managing Active Campaigns
Automated campaigns can be managed while they are active:
- Edit – You can update the trigger settings, email content, or recipients even while the campaign is active. Changes take effect on the next run.
- Deactivate – Pause the campaign to stop future triggers from firing. No emails will be sent while deactivated.
- Reactivate – Resume a deactivated campaign at any time.
- Duplicate – Create a copy of the campaign to use as a starting point for a new one.
- Delete – Permanently remove the campaign and its run history.
How Automated Campaigns Execute
Event-based execution flow:
- A matching event occurs (e.g. a new post is published)
- QuillCRM checks for active automated campaigns that match the event criteria
- An event is queued in the campaign events table
- The event processor picks up the queued event and executes the campaign
- Emails are sent to all matching recipients
- The run is recorded with delivery statistics
- The campaign returns to Active status, ready for the next trigger
Schedule-based execution flow:
- The WordPress action scheduler fires at the configured time
- The campaign processes all matching recipients
- Emails are sent and the run is recorded
- The campaign returns to Active status until the next scheduled time
Best Practices
- Test before activating – Use the “Send Test Email” feature to preview how your automated email looks before going live.
- Use descriptive names—name your campaigns clearly (e.g., “Weekly Newsletter” or “New Product Announcement”) since you may accumulate many over time.
- Monitor run history – Check the execution runs regularly to ensure deliverability and engagement remain healthy.
- Segment your recipients—use specific lists or tags rather than sending to all contacts to keep emails relevant.
- Leverage merge tags – For event-based campaigns, use dynamic content merge tags to personalize each email with the triggering post’s details.
- Combine with automations—Use automated campaigns alongside QuillCRM’s Automations feature for even more sophisticated workflows.