


One of the most powerful features of Quill CRM is the ability to connect Email Sequences with Automations. This allows you to automatically enroll contacts into a drip email sequence when specific events occur — such as when a contact is created, a form is submitted, a tag is added, a deal reaches a certain stage, or any other automation trigger fires.
The “Send Email Sequence” Action
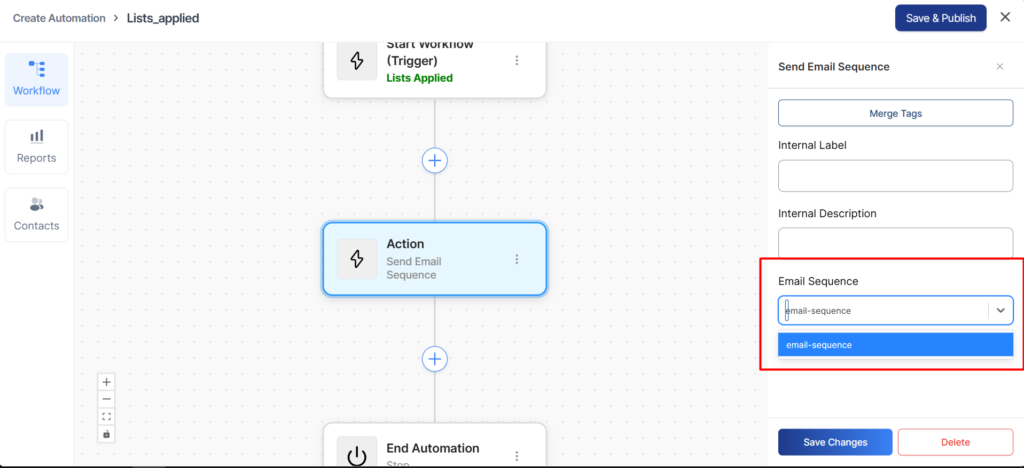
In the Quill CRM Automation builder, you can add a “Send Email Sequence” action step to any workflow. This action enrolls the contact (who triggered the automation) into a specified email sequence.
How to Add It
- Go to Quill CRM → Automations and create a new automation or edit an existing one.
- In the workflow builder, add a new Action step.
- From the action type list, select “Send Email Sequence” (found under the Email category).
- In the action settings, select the email sequence you want to enroll contacts into from the dropdown list.
- Save your automation.
Configuration Options
| Setting | Description |
|---|---|
| Email Sequence | Select which email sequence to enroll the contact into. Only sequences of type “Email Sequence” will appear in the dropdown. |
How It Works Behind the Scenes
When the automation reaches the “Send Email Sequence” action for a contact, the following happens:
- Validation: The system verifies that:
- The selected sequence exists and is a valid email sequence.
- The contact has a valid, non-empty email address.
- The contact’s email status is “subscribed”.
- Enrollment: If validation passes, the contact is enrolled in the sequence. Their enrollment timestamp is recorded, and the sequence steps begin their individual countdown timers.
- Duplicate Prevention: If the contact is already enrolled in the sequence, the action is skipped (they will not be re-enrolled). The automation will still continue to the next step.
- Automation Continues: After enrollment (or skip), the automation workflow moves to the next action in the sequence. The “Send Email Sequence” action does not block or wait for the email sequence to complete.
Example Workflows
Welcome Series for New Contacts
Trigger: Contact Created
Action 1: Add Tag “New Subscriber”
Action 2: Send Email Sequence → “Welcome Series”
When a new contact is added to your CRM, they automatically receive a tag and are enrolled in your welcome email series.
Post-Purchase Follow-Up
Trigger: Product Purchased (via WooCommerce, EDD, etc.)
Condition: Product = “Pro Plan”
Action 1: Add Tag “Customer”
Action 2: Send Email Sequence → “Pro Onboarding”
After a customer purchases your Pro Plan, they are enrolled in a targeted onboarding sequence specific to that product.
Lead Nurturing Based on Interest
Trigger: Tag Added = “Interested in Feature X”
Action: Send Email Sequence → “Feature X Education Series”
When a sales rep tags a contact as interested in a specific feature, an educational email sequence is triggered automatically.
Re-engagement Campaign
Trigger: Lead Score drops below threshold
Action: Send Email Sequence → “Re-engagement Series”
When a contact’s engagement score drops, automatically try to re-engage them with a targeted sequence.
What Happens When a Contact Is Skipped?
A contact will be skipped (not enrolled) if any of the following are true:
- The contact does not have a valid email address.
- The contact’s email status is not “subscribed” (e.g., they’ve unsubscribed or are marked as bounced).
- The contact is already enrolled in the same sequence.
When a contact is skipped, the automation still continues to the next step — it does not stop or fail.
Monitoring Sequence Enrollment from Automations
To verify that contacts are being enrolled correctly:
- Go to Quill CRM → Email Sequences and open the relevant sequence.
- Click “View Subscribers” to see all enrolled contacts, their enrollment dates, and their current status.
- Check the step reports to see delivery and engagement metrics for each email in the sequence.
Tips and Best Practices
- Test your sequence first: Before connecting it to an automation with many contacts, test the sequence with a small group to ensure the content, timing, and delivery are working correctly.
- Use conditions before the action: Add automation conditions (e.g., check if tag exists, check email status) before the “Send Email Sequence” action to filter contacts more precisely.
- Combine with other actions: You can add multiple actions before and after the sequence enrollment — for example, add a tag, update a custom field, notify a team member via Slack, and then enroll in a sequence.
- One sequence per purpose: Create separate sequences for different purposes (onboarding, nurturing, re-engagement) rather than one large sequence, so you can connect each to the right automation trigger.
- Monitor exit reasons: Check the subscriber list periodically to see if contacts are being removed (unsubscribed, bounced) and adjust your strategy accordingly.